Dento-Facial Analyzer Technique: Capturing Records

October 1, 2018 Lee Ann Brady DMD

You can gather accurate functional and esthetic information using the Panadent Dento-Facial Analyzer for restorative cases. I’ve found this tool particularly effective compared to alternatives such as the Facebow or stick bite.

If you haven’t done so yet, make sure to check out the introduction to this series on the Dento-Facial Analyzer. It includes background information, armamentarium, and key reasons why the device can elevate patient care.

Without further ado, the Dento-Facial Analyzer technique:

Essentials of Dento-Facial Analyzer Technique

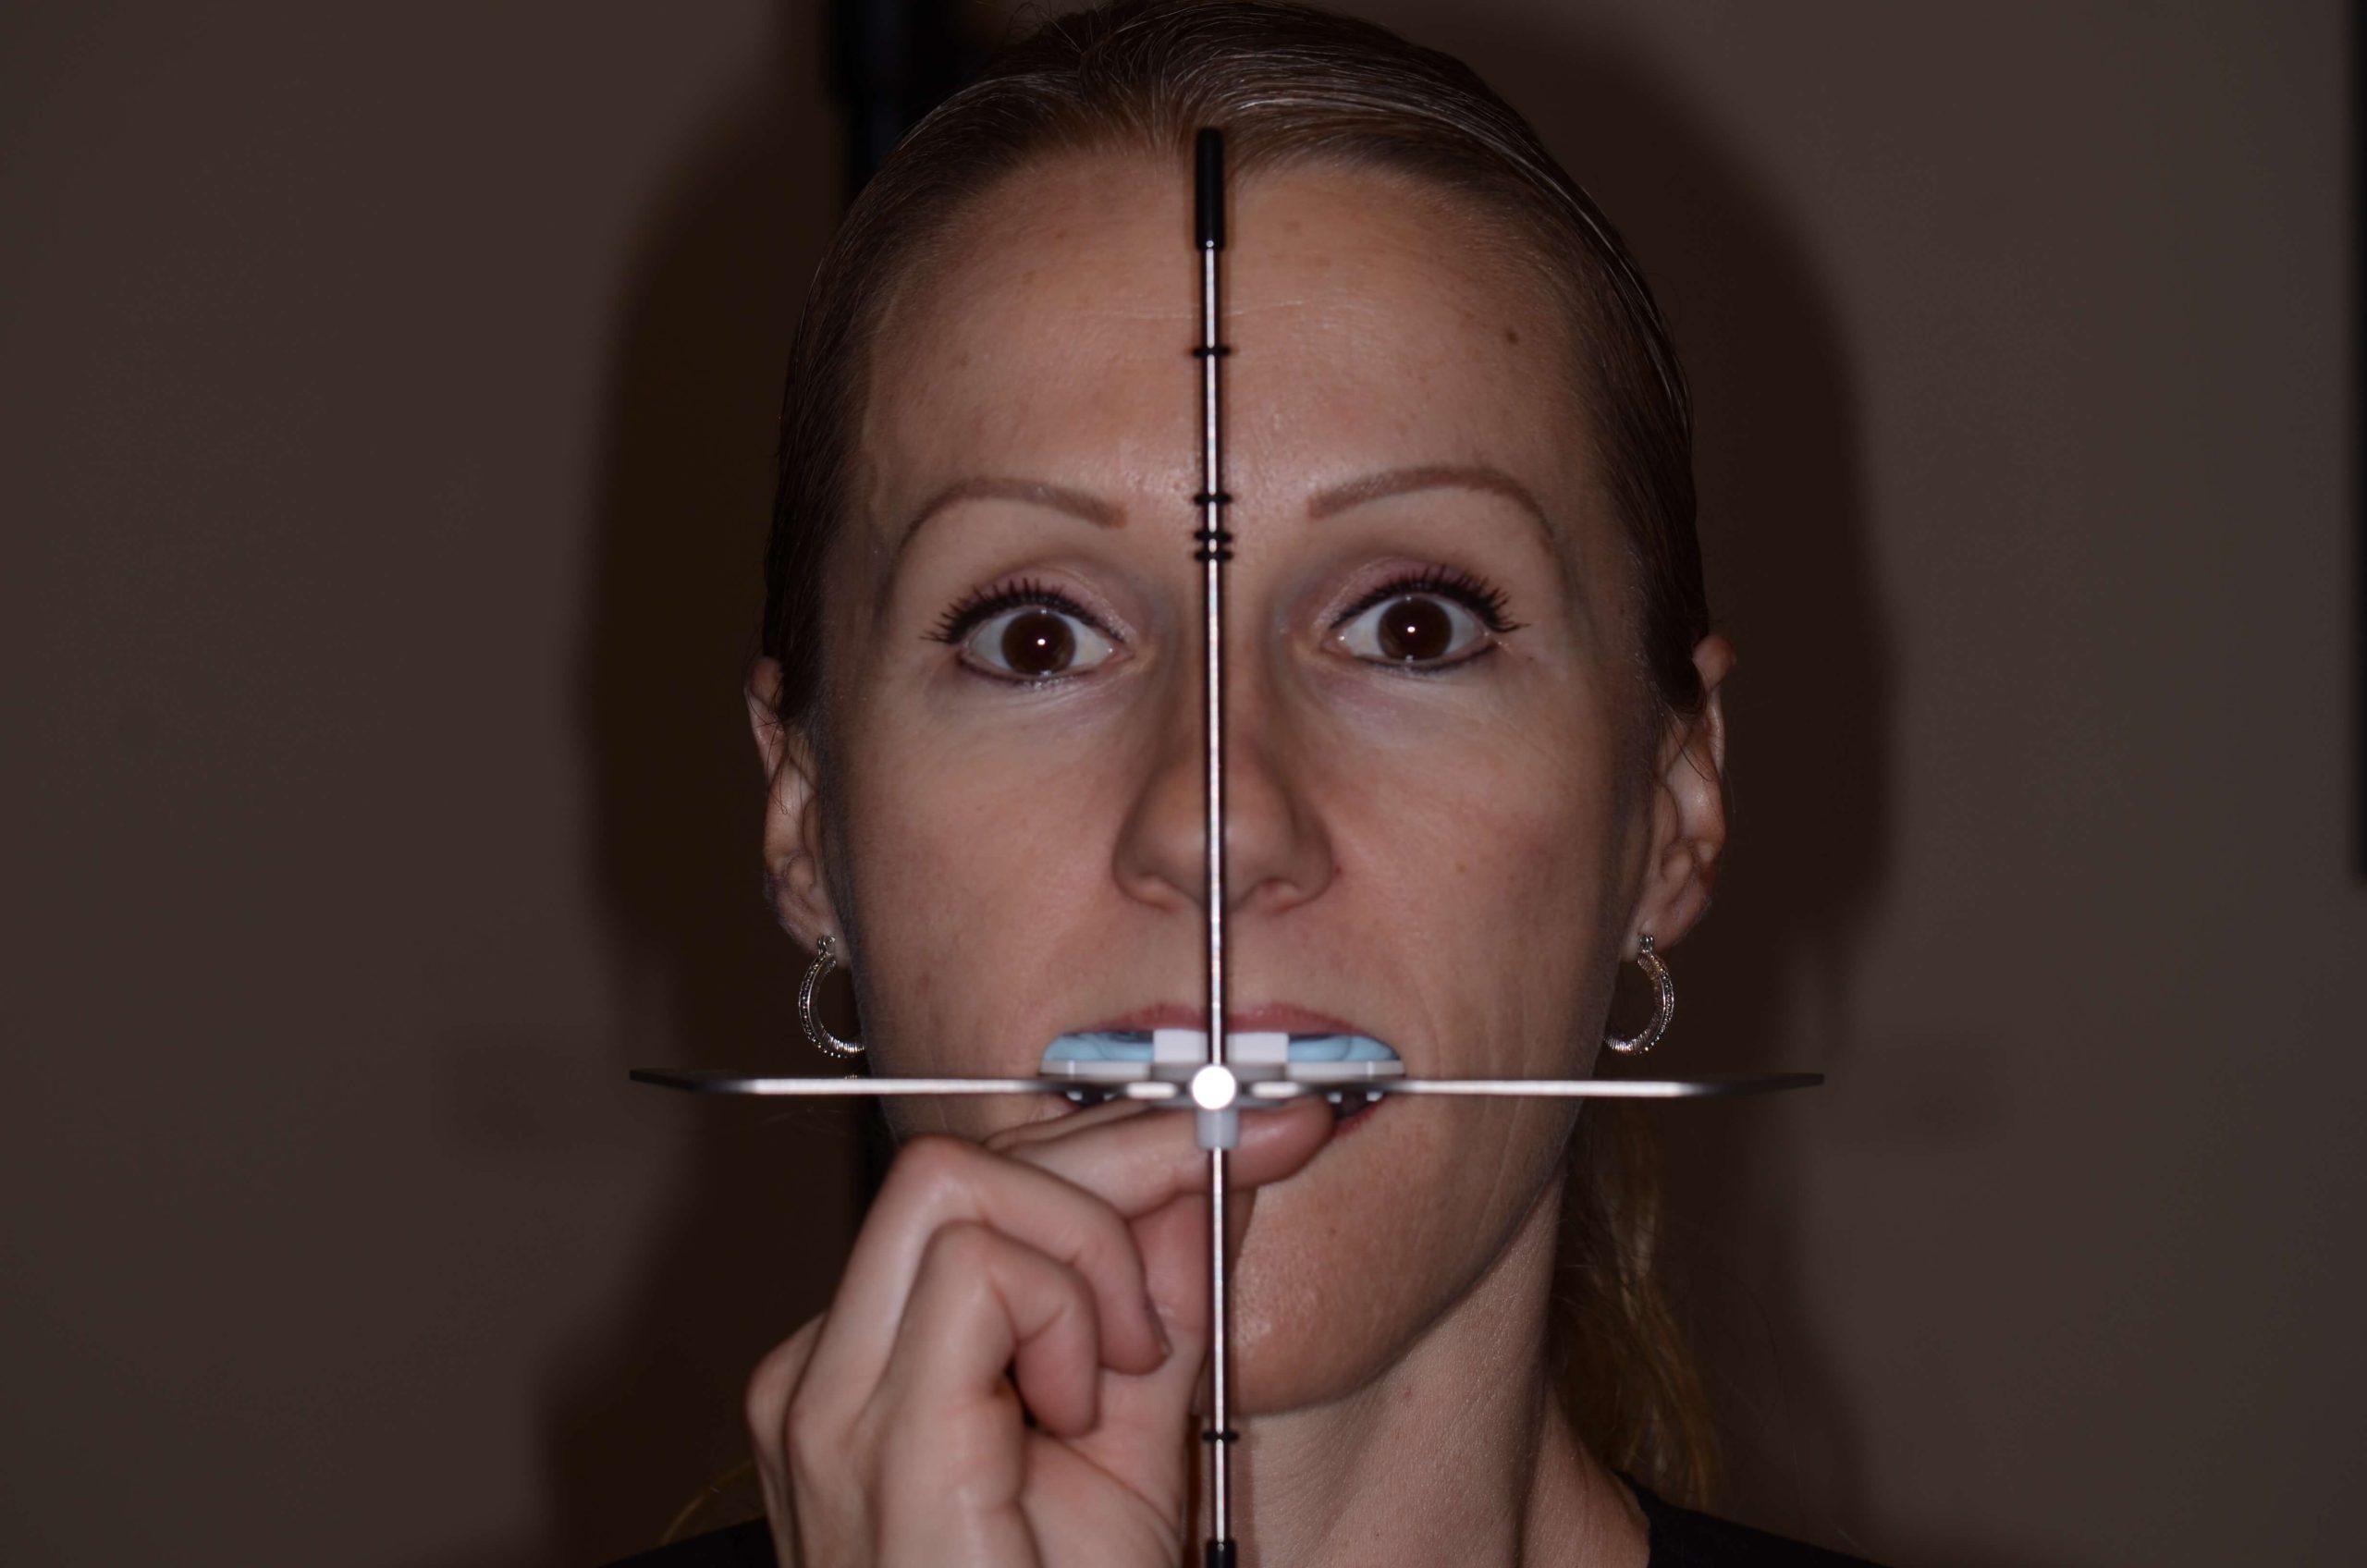
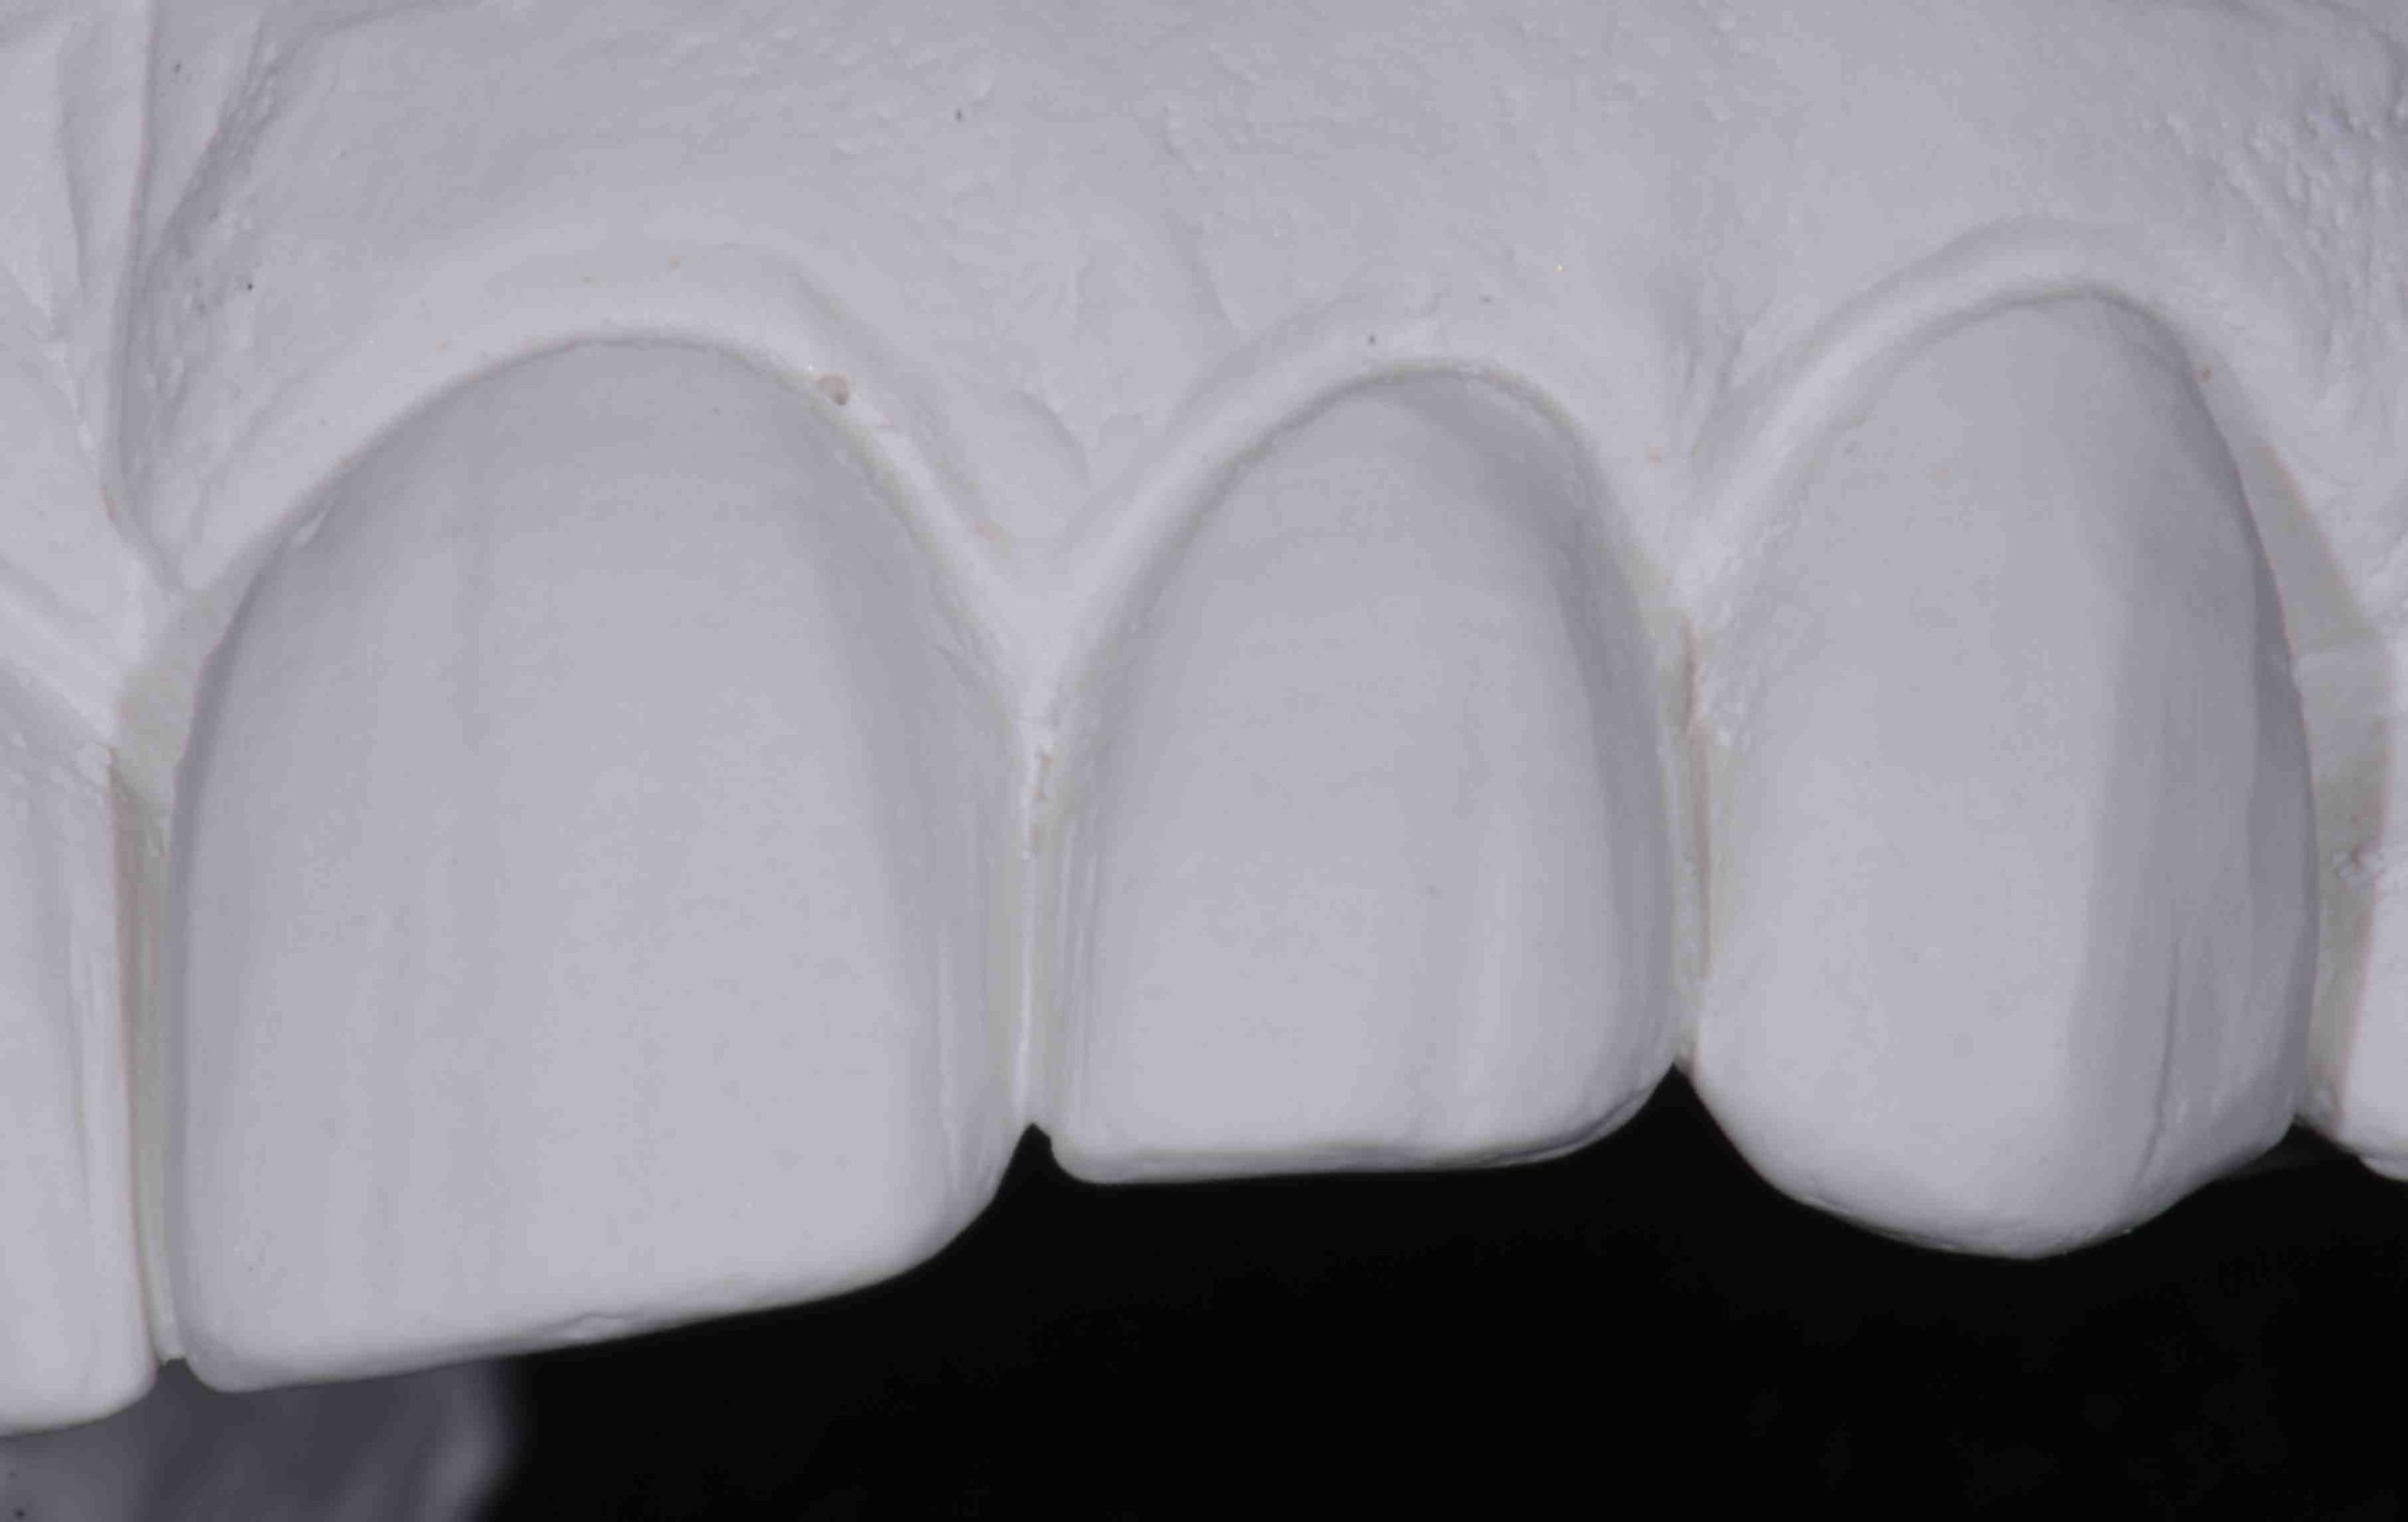
Once you have the white disposable plate – which is actually the piece you will send to the lab once the record is captured – snapped onto the Dento-Facial Analyzer, use VPS tray adhesive to lightly coat the plastic tray. You are only going to do this from about the canine position posteriorly because you aren’t going to put silicone on the anterior portion of that bite plate.

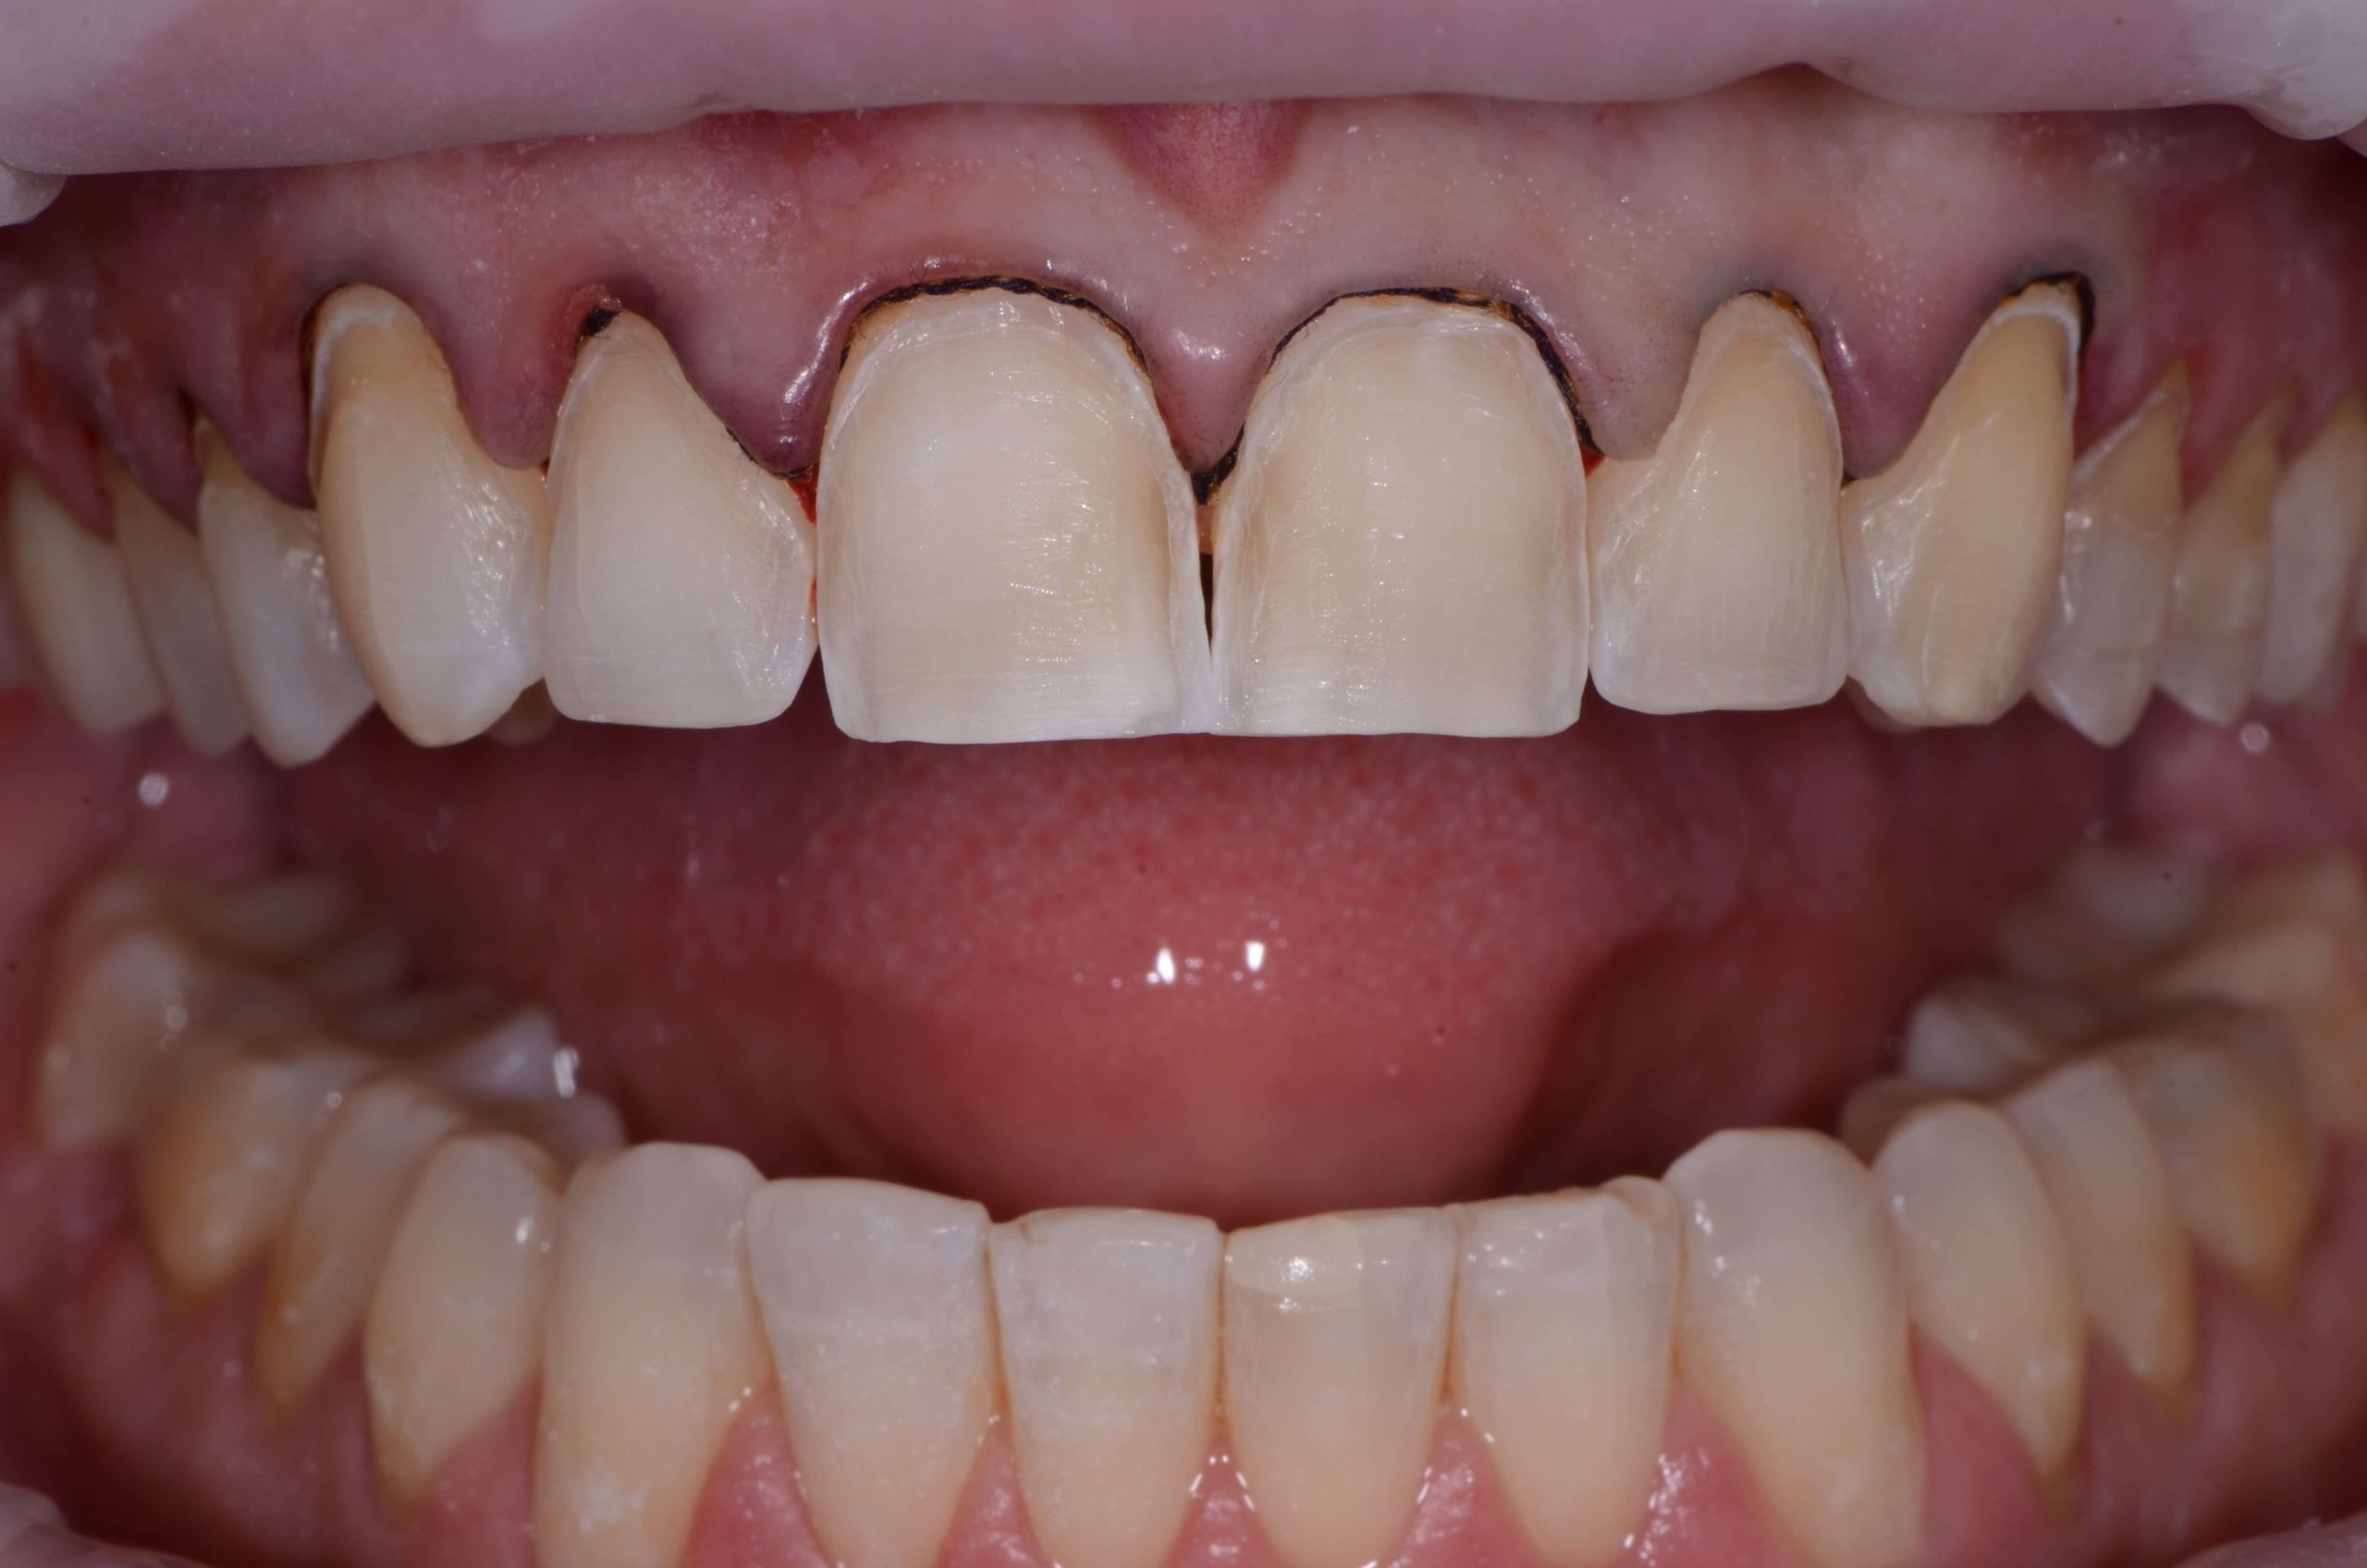
Next, attach the vertical reference bar to the Dento-Facial Analyzer. Without bite registration on it, take it to the patient’s mouth and seat the central incisors exactly against the white plastic in the front labially.

Verify that you can hold this level to the horizon in two planes of space and that you can touch the patient’s teeth. If not, you might need to build up the posterior.

If you’ve verified this, put bite silicone on the plate from the canine position back, then seat it again, making sure the central incisors are seated labially against the white plastic …

I’ll round up this fun technique with Part 3 in the series coming soon.

For a hands-on lesson in the Dento-Facial Analyzer from our talented educators, check out our Essentials 1 Pankey course. Also, watch this video for a quick refresher or pre-course overview.  

Related Course

Pankey Scholar 14B

DATE: August 15 2024 @ 6:00 pm - August 17 2024 @ 3:00 pm

Location: The Pankey Institute

CE HOURS: 0

Dentist Tuition: $ 3905

Single Occupancy with Ensuite Private Bath (per night): $ 290

“A Pankey Scholar is one who has demonstrated a commitment to apply the principles, practices and philosophy they learned through their journey at The Pankey Institute.”   At its core,…

Learn More>

About Author

User Image
Lee Ann Brady DMD

Dr. Lee Ann Brady is passionate about dentistry, her family and making a difference. She is a general dentist and owns a practice in Glendale, AZ limited to restorative dentistry. Lee’s passion for dental education began as a CE junkie herself, pursuing lots of advanced continuing education focused on Restorative and Occlusion. In 2005, she became a full time resident faculty member for The Pankey Institute, and was promoted to Clinical Director in 2006. Lee joined Spear Education as Executive VP of Education in the fall of 2008 to teach and coordinate the educational curriculum. In June of 2011, she left Spear Education, founded leeannbrady.com and joined the dental practice she now owns as an associate. Today, she teaches at dental meetings and study clubs both nationally and internationally, continues to write for dental journals and her website, sits on the editorial board of the Journal of Cosmetic Dentistry, Inside Dentistry and DentalTown Magazines and is the Director of Education for The Pankey Institute.

FIND A PANKEY DENTIST OR TECHNICIAN

I AM A
I AM INTERESTED IN

VIEW COURSE CALENDAR

Panadent Dento-Facial Analyzer Technique: Introduction

September 21, 2018 Lee Ann Brady DMD

The Dento-Facial Analyzer is a marvelous tool I use in the practice to mount maxillary models. It has made a huge difference in my practice of dentistry and is one of my favorite tools to teach.

Introduction to the Dento-Facial Analyzer

For the critical aspects of diagnostics and sending info to the lab for the completion of a restorative case, mounting models appropriately is so important. They must be mounted in three planes of space referenced to hinge access to capture esthetic information including incisal plane and occlusal plane relative to the horizon.

Traditionally, this has been accomplished by utilizing a Facebow, Earbow, or by actually capturing hinge access position. Now, we have the option of using the Kois Dento-Facial Analyzer to capture both functional information and esthetic information that we would normally get with a Fox’s bite plane or stick bite. All of this functionality is managed with one simple device.

The Kois Dento-Facial Analyzer was designed based on scientific information gathered by Dr. John Kois, which shows that the distance from the incisal edge position of the maxillary central incisors to hinge access on average is 100 mm. Most people fall within a range of 5 mm to the average, therefore this is the assumption made when the device takes a record.

The armamentarium for record capturing with the Panadent instrument includes the analyzer, bite registration silicone in a gun with a tip, VPS adhesive used in an impression tray, and disposable bite plates that snap onto the analyzer (from the device manufacturer Panadent).

You can use bite registration silicone, Panadent bite tabs, wax, or VPS heavy body impression material to capture the record …

I’ll continue this review of the Dento-Facial Analyzer technique in Part 2, coming soon! And don’t miss one of my recent Pankey Gram favorites from Dr. Bill Gregg on an occlusion-focused hygiene exam. Read it here for his insightful tips.

For an in-person, hands-on lesson in the Dento-Facial Analyzer, check out our Essentials 1 Pankey course. You can also watch this video for a quick refresher.  

Related Course

E1: Aesthetic & Functional Treatment Planning

DATE: August 22 2024 @ 8:00 am - August 25 2024 @ 2:30 pm

Location: The Pankey Institute

CE HOURS: 39

Dentist Tuition: $ 6500

Single Occupancy Room with Ensuite Bath (Per Night): $ 290

Transform your experience of practicing dentistry, increase predictability, profitability and fulfillment. The Essentials Series is the Key, and Aesthetic and Functional Treatment Planning is where your journey begins.  Following a system of…

Learn More>

About Author

User Image
Lee Ann Brady DMD

Dr. Lee Ann Brady is passionate about dentistry, her family and making a difference. She is a general dentist and owns a practice in Glendale, AZ limited to restorative dentistry. Lee’s passion for dental education began as a CE junkie herself, pursuing lots of advanced continuing education focused on Restorative and Occlusion. In 2005, she became a full time resident faculty member for The Pankey Institute, and was promoted to Clinical Director in 2006. Lee joined Spear Education as Executive VP of Education in the fall of 2008 to teach and coordinate the educational curriculum. In June of 2011, she left Spear Education, founded leeannbrady.com and joined the dental practice she now owns as an associate. Today, she teaches at dental meetings and study clubs both nationally and internationally, continues to write for dental journals and her website, sits on the editorial board of the Journal of Cosmetic Dentistry, Inside Dentistry and DentalTown Magazines and is the Director of Education for The Pankey Institute.

FIND A PANKEY DENTIST OR TECHNICIAN

I AM A
I AM INTERESTED IN

VIEW COURSE CALENDAR

Shrink Wrap Provisional Technique for Predictable Veneers: Part 4

August 24, 2018 Lee Ann Brady DMD

Creating amazing provisionals primes the patient for a positive treatment experience and ensures they’ll be content even before the final veneers. Read on for the last post in our four-part shrink wrap provisionals fabrication series:

Checking Occlusion and Polishing Shrink Wrap Provisionals

After cleaning off most of the excess from the provisional with a universal scaler, extra fine mosquito diamond, and a brownie, use the same diamond to open the linguo-gingival embrasures with the intent that the patient should be able to pass floss through them. This also keeps the tissue as healthy as possible for the seat later on.

Now that you’ve done all your flash trim, you should check the protrusive and right and left excursive occlusion, making sure you have even marks and no fremitus. Check intercuspal position to ensure you have no fremitus there as well, either lying back or with the patient in the alert feeding position.

With everything trimmed and ready to go, the last step is simply to polish. You can use the Brasseler Featherlite porcelain polishing system running in a latch handpiece. Utilize the first of three polishers at about 15,000 RMP, then move to the second polisher at about 10,000 RPM. They can be run at a higher speed, but you’ll get way fewer uses out of the polishers. Finally, run the last of the three polishers at about 7,000 RPM.

If you notice a porosity after cleaning out the residue from the polishing, you can use a Venus Diamond flowable that matches the esthetics of the bisacryl exactly. Fill the void by manipulating the side of the explorer to drag away excess and feather it out. Then simply light cure so that food doesn’t pack into the void.

The final step of this shrink wrap technique is to use Dialite polishing paste from Brasseler in an impregnated bristle brush to create a perfectly smooth finish. The entire process of provisionalization should take no more than about fifteen minutes.


The Shrink Wrap Technique is taught in our hands on course Excellence in Bonded Porcelain.

Related Course

Surgically Facilitated Orthodontic Therapy: An Interdisciplinary Approach

DATE: April 26 2024 @ 2:00 pm - April 26 2024 @ 4:00 pm

Location: Online

CE HOURS: 2

Surgically Facilitated Orthodontic Therapy: An Interdisciplinary Approach Patients seeking ideal esthetics may require a more sophisticated diagnosis and treatment plan than what restorative dentistry or conventional orthodontic treatment may offer…

Learn More>

About Author

User Image
Lee Ann Brady DMD

Dr. Lee Ann Brady is passionate about dentistry, her family and making a difference. She is a general dentist and owns a practice in Glendale, AZ limited to restorative dentistry. Lee’s passion for dental education began as a CE junkie herself, pursuing lots of advanced continuing education focused on Restorative and Occlusion. In 2005, she became a full time resident faculty member for The Pankey Institute, and was promoted to Clinical Director in 2006. Lee joined Spear Education as Executive VP of Education in the fall of 2008 to teach and coordinate the educational curriculum. In June of 2011, she left Spear Education, founded leeannbrady.com and joined the dental practice she now owns as an associate. Today, she teaches at dental meetings and study clubs both nationally and internationally, continues to write for dental journals and her website, sits on the editorial board of the Journal of Cosmetic Dentistry, Inside Dentistry and DentalTown Magazines and is the Director of Education for The Pankey Institute.

FIND A PANKEY DENTIST OR TECHNICIAN

I AM A
I AM INTERESTED IN

VIEW COURSE CALENDAR

Shrink Wrap Provisional Technique for Predictable Veneers: Part 3

August 22, 2018 Lee Ann Brady DMD

Utilizing the shrink wrap technique for predictable veneers necessitates careful attention to materials selection and silicone matrix creation. Once you have created the matrix, cleaned the preps, and fully seated the matrix, you can use a 2 x 2 soaked thoroughly in rubbing alcohol to wipe across and remove the air-inhibited layer.

Cleaning Up the Veneers Preparation

Because of the matrix with the silicone gasket, almost all of the excess matrix material should flake off with a universal scaler. That’s why this technique works perfectly for preps with equigingival or supragingival margins. It works less well if you have a subgingival margin because the gasket separates the silicone right at the level of the existing free gingival margin.

On the lingual, you will have a very thin film of excess material sitting over the unprepared portion of the tooth. You can peel it off using the scaler. These provisionals are not easy to pull off or dislodge from the teeth. That means you don’t have to be cautious. The material will separate as if it has been perforated right where the margin was.

After the use of a universal scaler, you can check all the margins. You’ll realize you have virtually no excess. You can then utilize an extra fine mosquito diamond at 20,000 rpm dry in the speed reduction Brasseler NSK high speed attachment. You should open the facial gingival embrasures so the patient can get floss through them. This will lead to healthy gingival tissues that aren’t inflamed on the day of the seat.

Now switch to a brownie silicone point running dry at 10,000 to 20,000 rpm. A brownie at this speed will cut any kind of resin to create a perfect infinity margin right where the lingual reduction is on the preparations and remove any excess.

What common provisionals technique do you prefer for veneers? To be continued … 


The Shrink Wrap Technique is taught in our hands on course Excellence in Bonded Porcelain.

Related Course

Creating Great Case Acceptance

DATE: July 17 2024 @ 8:00 am - July 19 2024 @ 3:00 pm

Location: The Pankey Institute

CE HOURS: 26

Regular Tuition: $ 3400

night with private bath: $ 290

There are numerous courses marketed to dentists today that are focused on “Getting the patient to say yes” and “Increasing the ______ (fill in the blank) technical procedure to increase…

Learn More>

About Author

User Image
Lee Ann Brady DMD

Dr. Lee Ann Brady is passionate about dentistry, her family and making a difference. She is a general dentist and owns a practice in Glendale, AZ limited to restorative dentistry. Lee’s passion for dental education began as a CE junkie herself, pursuing lots of advanced continuing education focused on Restorative and Occlusion. In 2005, she became a full time resident faculty member for The Pankey Institute, and was promoted to Clinical Director in 2006. Lee joined Spear Education as Executive VP of Education in the fall of 2008 to teach and coordinate the educational curriculum. In June of 2011, she left Spear Education, founded leeannbrady.com and joined the dental practice she now owns as an associate. Today, she teaches at dental meetings and study clubs both nationally and internationally, continues to write for dental journals and her website, sits on the editorial board of the Journal of Cosmetic Dentistry, Inside Dentistry and DentalTown Magazines and is the Director of Education for The Pankey Institute.

FIND A PANKEY DENTIST OR TECHNICIAN

I AM A
I AM INTERESTED IN

VIEW COURSE CALENDAR

Shrink Wrap Provisional Technique for Predictable Veneers: Part 2

August 20, 2018 Lee Ann Brady DMD

Provisionals are an important part of veneers fabrication that requires just as much care and diligence as the final restoration. After acquiring diagnostic and lab records and fabricating a silicone matrix, the next step is to clean the preps with a dilute solution of 2% chlorhexidine prep scrub. Use a syringe tip with a fuzzy end for optimal brushing.

Cleaning the Veneer Preps and Loading the Matrix

The latter process ensures you start off with clean, bacteria-free preps. Rinse off the chlorhexidine and thoroughly dry the preps. With this technique you should spot-etch utilizing 35% phosphoric acid for a 3mm diameter spot on the facial or labial of the teeth.

Keep the etch far away from the margins and interproximals. Leave it for 30 seconds, rinse off, and vigorously dry the preparations. You can use an air/water syringe because a little contamination is fine.

You should then apply GLUMA from Kulzer to every prep, which is a combination of antimicrobial glutaraldehyde and HEMA that prevents tooth sensitivity. The GLUMA excess is dried with cotton to prevent it from getting in saliva or mucous membranes.

Now that teeth are ready, you can load the silicone matrix with a bisacryl material. Load the matrix by moving back and forth along the incisal edge and adding layers to minimize the incorporation of air bubbles. Fully seat it. One of the tricks with this matrix is the very flat occlusal table so you can apply even pressure. Additionally, adequate thickness of the silicone provides rigidity and accuracy with less trim needed.

Let the material stay in the mouth for the full set time, which is a little over four minutes. At that point, remove the matrix for completely hard bisacryl on the teeth.

To be continued …


The Shrink Wrap Technique is taught in our hands on course Excellence in Bonded Porcelain.

Related Course

E1: Aesthetic & Functional Treatment Planning

DATE: December 11 2025 @ 8:00 am - December 14 2025 @ 2:30 pm

Location: The Pankey Institute

CE HOURS: 39

Dentist Tuition: $ 6800

Single Occupancy with Ensuite Private Bath (Per Night): $ 345

Transform your experience of practicing dentistry, increase predictability, profitability and fulfillment. The Essentials Series is the Key, and Aesthetic and Functional Treatment Planning is where your journey begins.  Following a system of…

Learn More>

About Author

User Image
Lee Ann Brady DMD

Dr. Lee Ann Brady is passionate about dentistry, her family and making a difference. She is a general dentist and owns a practice in Glendale, AZ limited to restorative dentistry. Lee’s passion for dental education began as a CE junkie herself, pursuing lots of advanced continuing education focused on Restorative and Occlusion. In 2005, she became a full time resident faculty member for The Pankey Institute, and was promoted to Clinical Director in 2006. Lee joined Spear Education as Executive VP of Education in the fall of 2008 to teach and coordinate the educational curriculum. In June of 2011, she left Spear Education, founded leeannbrady.com and joined the dental practice she now owns as an associate. Today, she teaches at dental meetings and study clubs both nationally and internationally, continues to write for dental journals and her website, sits on the editorial board of the Journal of Cosmetic Dentistry, Inside Dentistry and DentalTown Magazines and is the Director of Education for The Pankey Institute.

FIND A PANKEY DENTIST OR TECHNICIAN

I AM A
I AM INTERESTED IN

VIEW COURSE CALENDAR

Shrink Wrap Provisional Technique for Predictable Veneers: Part 1

August 17, 2018 Lee Ann Brady DMD

Of all the methods commonly used for veneer provisionalization, my favorite has to be the shrink wrap technique. I love it and use it all the time because in my opinion it is the easiest and most predictable method.

The term ‘shrink wrap’ comes from allowing polymerization shrinkage of the material to lock bisacryl onto the preparation. The main advantage of this approach is that it keeps veneer provisionals firmly secured until the final restoration can be placed.

Here’s my take on utilizing this technique in the dental practice:

Predictable Veneers with Shrink Wrap Provisionals

The first step of shrink wrap provisionals is to prepare the teeth. Let’s imagine you are dealing with a patient who experienced trauma such as breaking their teeth in a bicycle accident.

Before beginning the technique, make sure you have all the diagnostic records you need, including all prep records for the lab: facebow, opposing model, final impressions (maybe more than one) with good flash, etc. Once you provisionalize the teeth, it won’t be easy to get access to the preps again.

One of the essential parts of a shrink wrap provisional technique is fabrication of a silicone matrix with a silicone gasket to separate the excess. You should begin with a solid model either of the teeth before they are prepared or of the wax-up. You can carve a 1 mm deep trench into the wax-up by using the cleoid end of a cleoid/discoid.

Put the sharp pointy end right on the free gingival margin of the gingival of the tooth on the model to carve. You can even go a little deeper in the interproximals. Now take that model and fabricate a two stage silicone matrix.

First, create a putty matrix and trim it. Then, load the putty with the light body of the same impression system, reseat on the model, allow it to achieve a full set, and trim. Now you are ready to go to the patient and use lip retractors. Remember to add a little vaseline or lubricant to the lips for comfort.

At this point, I like to use the OptraGate from Ivoclar Vivadent for a latex free retraction device that can handle anything in the anterior. I will have it in during preparation and for impressions so I don’t have to hold the lip out of the way.

To be continued …


The Shrink Wrap Technique is taught in our hands on course Excellence in Bonded Porcelain.

Related Course

E3: Restorative Integration of Form & Function

DATE: August 11 2024 @ 8:00 am - August 15 2024 @ 2:30 pm

Location: The Pankey Institute

CE HOURS: 41

Full Tuititon: $ 7200

night with private bath: $ 290

Understanding that “form follows function” is critical for knowing how to blend what looks good with what predictably functions well. E3 is the phase of your Essentials journey in which…

Learn More>

About Author

User Image
Lee Ann Brady DMD

Dr. Lee Ann Brady is passionate about dentistry, her family and making a difference. She is a general dentist and owns a practice in Glendale, AZ limited to restorative dentistry. Lee’s passion for dental education began as a CE junkie herself, pursuing lots of advanced continuing education focused on Restorative and Occlusion. In 2005, she became a full time resident faculty member for The Pankey Institute, and was promoted to Clinical Director in 2006. Lee joined Spear Education as Executive VP of Education in the fall of 2008 to teach and coordinate the educational curriculum. In June of 2011, she left Spear Education, founded leeannbrady.com and joined the dental practice she now owns as an associate. Today, she teaches at dental meetings and study clubs both nationally and internationally, continues to write for dental journals and her website, sits on the editorial board of the Journal of Cosmetic Dentistry, Inside Dentistry and DentalTown Magazines and is the Director of Education for The Pankey Institute.

FIND A PANKEY DENTIST OR TECHNICIAN

I AM A
I AM INTERESTED IN

VIEW COURSE CALENDAR

Fixing the Failed Restoration: Provisional and Placement

August 1, 2018 Lee Ann Brady DMD

My patient wasn’t satisfied with the esthetics and feel of her previous restoration. Detailed planning enabled me to deliver a beautiful, functional result. Here is the conclusion of this case and placement of the new six unit anterior bridge:

Failed Restoration: Provisional

After the treatment planning was completed, I removed the patient’s existing anterior bridge and replaced it with a bisacryl provisional derived from the orthodontic wax-up. I sectioned it specifically to enable tooth movement while I restored the pontic sites. This meant sectioning between the maxillary central, the upper left lateral and central, and the upper right canine and lateral.

I then cemented the provisional with Rely-X luting cement. Doing so decreased displacement secondary to the orthodontic forces. Next, the patient went through orthodontic therapy over three months. Following this, she was ready for periodontal surgery. Crown lengthening was done on the upper right canine, in addition to placing connective tissue grafts in the pontic sites. This ensured ovate pontics could develop.

Failed Restoration: Equilibration & Placement

Equilibration was the natural next step. It was used to achieve the necessary anterior guidance with posterior disclusion, as well as freedom in the anterior and no centric occlusion slide to maximum intercuspal position.

I prepped off the orthodontic provisional and refined the preparation. For the margin design, I went with a shoulder and rounded internal line. This could accommodate the all-porcelain restorations.

We weren’t worried about the reduction of 1.5 mm because of the original tooth reduction, but we did go forward with placement of a third plane of reduction. This was necessary for final incisal edge placement in a AP dimension.

Venus from Hereaus was used to create the six unit provisional from upper right to upper left canine. This also allowed tissue development to occur in the pontic sites.

After taking final impressions three months later, the six unit bridge was made using E.max. I placed the patient’s direct composite veneers on the upper first molars and bicuspids. Shade matching to the anterior bridge was one advantage of this approach. Also, the patient could choose to move to porcelain at some point in the future.

My patient was finally happy with her smile. All in all, it took dedicated teamwork between myself, the ceramist, orthodontist, and periodontist to exceed her expectations. 

Related Course

Today’s Top Clinical Tips: 2024

DATE: October 18 2024 @ 12:00 pm - October 18 2024 @ 4:00 pm

Location: Online

CE HOURS: 4

Today’s Top Clinical Tips: 2024 Dentistry is changing at a rapid pace. Being successful and efficient is about staying on top of the newest trends and clinical tips. In this…

Learn More>

About Author

User Image
Lee Ann Brady DMD

Dr. Lee Ann Brady is passionate about dentistry, her family and making a difference. She is a general dentist and owns a practice in Glendale, AZ limited to restorative dentistry. Lee’s passion for dental education began as a CE junkie herself, pursuing lots of advanced continuing education focused on Restorative and Occlusion. In 2005, she became a full time resident faculty member for The Pankey Institute, and was promoted to Clinical Director in 2006. Lee joined Spear Education as Executive VP of Education in the fall of 2008 to teach and coordinate the educational curriculum. In June of 2011, she left Spear Education, founded leeannbrady.com and joined the dental practice she now owns as an associate. Today, she teaches at dental meetings and study clubs both nationally and internationally, continues to write for dental journals and her website, sits on the editorial board of the Journal of Cosmetic Dentistry, Inside Dentistry and DentalTown Magazines and is the Director of Education for The Pankey Institute.

FIND A PANKEY DENTIST OR TECHNICIAN

I AM A
I AM INTERESTED IN

VIEW COURSE CALENDAR

Fixing the Failed Restoration: Treatment Planning

July 30, 2018 Lee Ann Brady DMD

Replacing a failed restoration starts with a careful examination of the patient’s needs, desires, and current oral health. My patient in this case presented with a six unit anterior bridge, decay, and many esthetic issues. After an esthetic evaluation and comprehensive exam, it was time to move on to treatment planning.

Failed Restoration: Treatment Plan

To treatment plan this case, I relied on an advanced facially-generated treatment planning system for communicating with the rest of the team. Communication is essential to a reliable outcome.

First, a diagnostic work-up was generated. Then, the interdisciplinary team together developed a final treatment plan and sequence, with the incisal edge position of the upper right central as reference.

We chose orthodontic extrusion of the upper teeth to handle proclination in the anterior and the gingival discrepancy. Additionally, we treatment panned the maxillary right canine for over-extrusion by 2 mm. This was done to achieve adequate restorative ferrule through crown lengthening, not to mention re-treatment endodontic therapy with post and core.

We talked about implant therapy, but ultimately it was not a workable solution. Root proximity on the upper right and the gingival tissues meant it wasn’t ideal as a first option. For the final treatment, we decided on placing a six unit anterior bridge. I then discussed the outcome with the patient and she decided conservative therapy for the posterior esthetics of direct composite veneers was best. This enabled us to create consistent contour and shade.

Next up was the lab, which made a pre-orthodontic wax-up based on periodontal surgery and planned tooth movement. I gave them the proper information by using PowerPoint and digital photography with the proposed tooth positions. After this, the post and core endodontic re-treatment was done for the upper right canine.

To be continued…

What’s your approach to treatment planning? 

Related Course

E4: Posterior Reconstruction and Completing the Comprehensive Treatment Sequence

DATE: October 30 2025 @ 8:00 am - November 3 2025 @ 2:30 pm

Location: The Pankey Institute

CE HOURS: 44

Dentist Tuition: $ 7400

Single Occupancy with Ensuite Private Bath (per night): $ 345

The purpose of this course is to help you develop mastery with complex cases involving advanced restorative procedures, precise sequencing and interdisciplinary coordination. Building on the learning in Essentials Three…

Learn More>

About Author

User Image
Lee Ann Brady DMD

Dr. Lee Ann Brady is passionate about dentistry, her family and making a difference. She is a general dentist and owns a practice in Glendale, AZ limited to restorative dentistry. Lee’s passion for dental education began as a CE junkie herself, pursuing lots of advanced continuing education focused on Restorative and Occlusion. In 2005, she became a full time resident faculty member for The Pankey Institute, and was promoted to Clinical Director in 2006. Lee joined Spear Education as Executive VP of Education in the fall of 2008 to teach and coordinate the educational curriculum. In June of 2011, she left Spear Education, founded leeannbrady.com and joined the dental practice she now owns as an associate. Today, she teaches at dental meetings and study clubs both nationally and internationally, continues to write for dental journals and her website, sits on the editorial board of the Journal of Cosmetic Dentistry, Inside Dentistry and DentalTown Magazines and is the Director of Education for The Pankey Institute.

FIND A PANKEY DENTIST OR TECHNICIAN

I AM A
I AM INTERESTED IN

VIEW COURSE CALENDAR

Fixing the Failed Restoration: Exam & Evaluation

July 29, 2018 Lee Ann Brady DMD

A comprehensive exam is the first step in a long line of decisions that can end in case success or failure. For this case, my patient presented with a litany of problems and dental concerns.

Failed Restoration: Patient History

When I first encountered the patient, she had a six unit anterior bridge with temporary cement. She came to my practice because she was unhappy with how her dental work looked and was interested in a permanent restoration that would truly suit her goals.

She had a checkered dental history beginning with orthodontic treatment for a diastema between the maxillary centrals and a left maxillary lateral that fractured down to the root and had to be removed. After a FPD was placed for the tooth removal, her diastema reopened and the right maxillary was also lost to fracture.

That wasn’t even it for the patient’s woes. She was given a bridge that made her very unhappy and also had to have endodontic therapy on the upper right canine. Despite multiple placements, the restoration was never to her liking.

Esthetically, the patient wanted to remedy her uneven gingival margin, the length of the upper right canine, the relative size of laterals and centrals, and the color match. The latter was difficult to remedy because of tetracycline staining from her childhood. Finally, she was also displeased with the thick feeling of the bridge.

All of this together painted a picture of a patient in need of serious help.

Failed Restoration: Evaluation & Exam

My esthetic evaluation confirmed many of her concerns. I completed it intraorally and with diagnostic photographs. The patient presented with tooth proportion asymmetries, inadequate tooth display at rest on one central, an uneven incisal plane, and gingival discrepancies.

Her comprehensive exam revealed normal TMD joints, but also showed posterior wear. She had muscle pain and headaches yet no muscle tenderness. I put her on six weeks of appliance therapy, which led to the discovery that she had a habit of ‘power wiggling.’ I was then able to obtain an accurate centric relation bite record.

I removed the anterior bridge for radiography of the abutments. It became clear that her maxillary right canine had a lot of decay and inadequate ferrule.

To be continued…

Related Course

E4: Posterior Reconstruction and Completing the Comprehensive Treatment Sequence

DATE: October 30 2025 @ 8:00 am - November 3 2025 @ 2:30 pm

Location: The Pankey Institute

CE HOURS: 44

Dentist Tuition: $ 7400

Single Occupancy with Ensuite Private Bath (per night): $ 345

The purpose of this course is to help you develop mastery with complex cases involving advanced restorative procedures, precise sequencing and interdisciplinary coordination. Building on the learning in Essentials Three…

Learn More>

About Author

User Image
Lee Ann Brady DMD

Dr. Lee Ann Brady is passionate about dentistry, her family and making a difference. She is a general dentist and owns a practice in Glendale, AZ limited to restorative dentistry. Lee’s passion for dental education began as a CE junkie herself, pursuing lots of advanced continuing education focused on Restorative and Occlusion. In 2005, she became a full time resident faculty member for The Pankey Institute, and was promoted to Clinical Director in 2006. Lee joined Spear Education as Executive VP of Education in the fall of 2008 to teach and coordinate the educational curriculum. In June of 2011, she left Spear Education, founded leeannbrady.com and joined the dental practice she now owns as an associate. Today, she teaches at dental meetings and study clubs both nationally and internationally, continues to write for dental journals and her website, sits on the editorial board of the Journal of Cosmetic Dentistry, Inside Dentistry and DentalTown Magazines and is the Director of Education for The Pankey Institute.

FIND A PANKEY DENTIST OR TECHNICIAN

I AM A
I AM INTERESTED IN

VIEW COURSE CALENDAR

Let Patients Try a Smile

July 27, 2018 Pankey Gram

Like with any big purchase or expensive commitment, it’s not surprising patients would want to try on a new smile before going all in. You wouldn’t expect someone to purchase a sports car without first riding it around the dealership, would you?

Think of your cosmetic treatment as a high-end experience and your patients will too. Even the most hesitant spenders will be much more interested in moving forward if they’ve gotten a taste of how beautiful their smile really can be. This is where the ‘trial smile’ comes in.

Cosmetic Case Acceptance: Let Patients Try Their Smile

There’s no need to feel daunted by the process of creating a trial smile. Patients want to find a dentist who will offer them the kind of care they feel they deserve and who are willing to give them exactly what they want. You’d be surprised how hard it can be to find someone who will listen to a patient’s expectations instead of delivering what they personally feel is best.

With esthetics, the patient should have the primary say. Invite your patients who have given indications of wanting cosmetic treatments to communicate their preferences in a very tangible manner. All you have to do is first conduct a co-discovery appointment complete with high-quality digital images and an occlusal exam as well. Then, temporarily put composite on their unprepared teeth.

With this strong foundation already in place, your patient can see the potential outcome of smile design. When you pitch a trial smile to them, you can even call it a ‘demo.’ If the patient loves what they see, it’s no problem to move on to a diagnostic wax-up using a model of their demo smile.

What case acceptance techniques do you find most effective? We’d love to know your thoughts in the comments section below!

Photo courtesy of Matt Roberts CDT, CMR Laboratory.

The Aesthetics Course taught by Matt Roberts, CDT, Dr. Frankie Shull, Dr. Susan Hollar, Dr. JA Reynolds and Mr. Michael Roberts is just the place to learn to use digital technology to help patients want an aesthetic makeover.


Related Course

E3: Restorative Integration of Form & Function

DATE: January 12 2025 @ 8:00 am - January 16 2025 @ 2:30 pm

Location: The Pankey Institute

CE HOURS: 41

Dentist Tuition: $ 7400

Single Occupancy with Ensuite Private Bath (per night): $ 345

THIS COURSE IS SOLD OUT Understanding that “form follows function” is critical for knowing how to blend what looks good with what predictably functions well. E3 is the phase of…

Learn More>

About Author

User Image
Pankey Gram

FIND A PANKEY DENTIST OR TECHNICIAN

I AM A
I AM INTERESTED IN

VIEW COURSE CALENDAR