4 Questions You Should Be Able to Answer To Improve Your Success With Indirect Bonded Anterior Restorations

August 16, 2021 Abdi Sameni

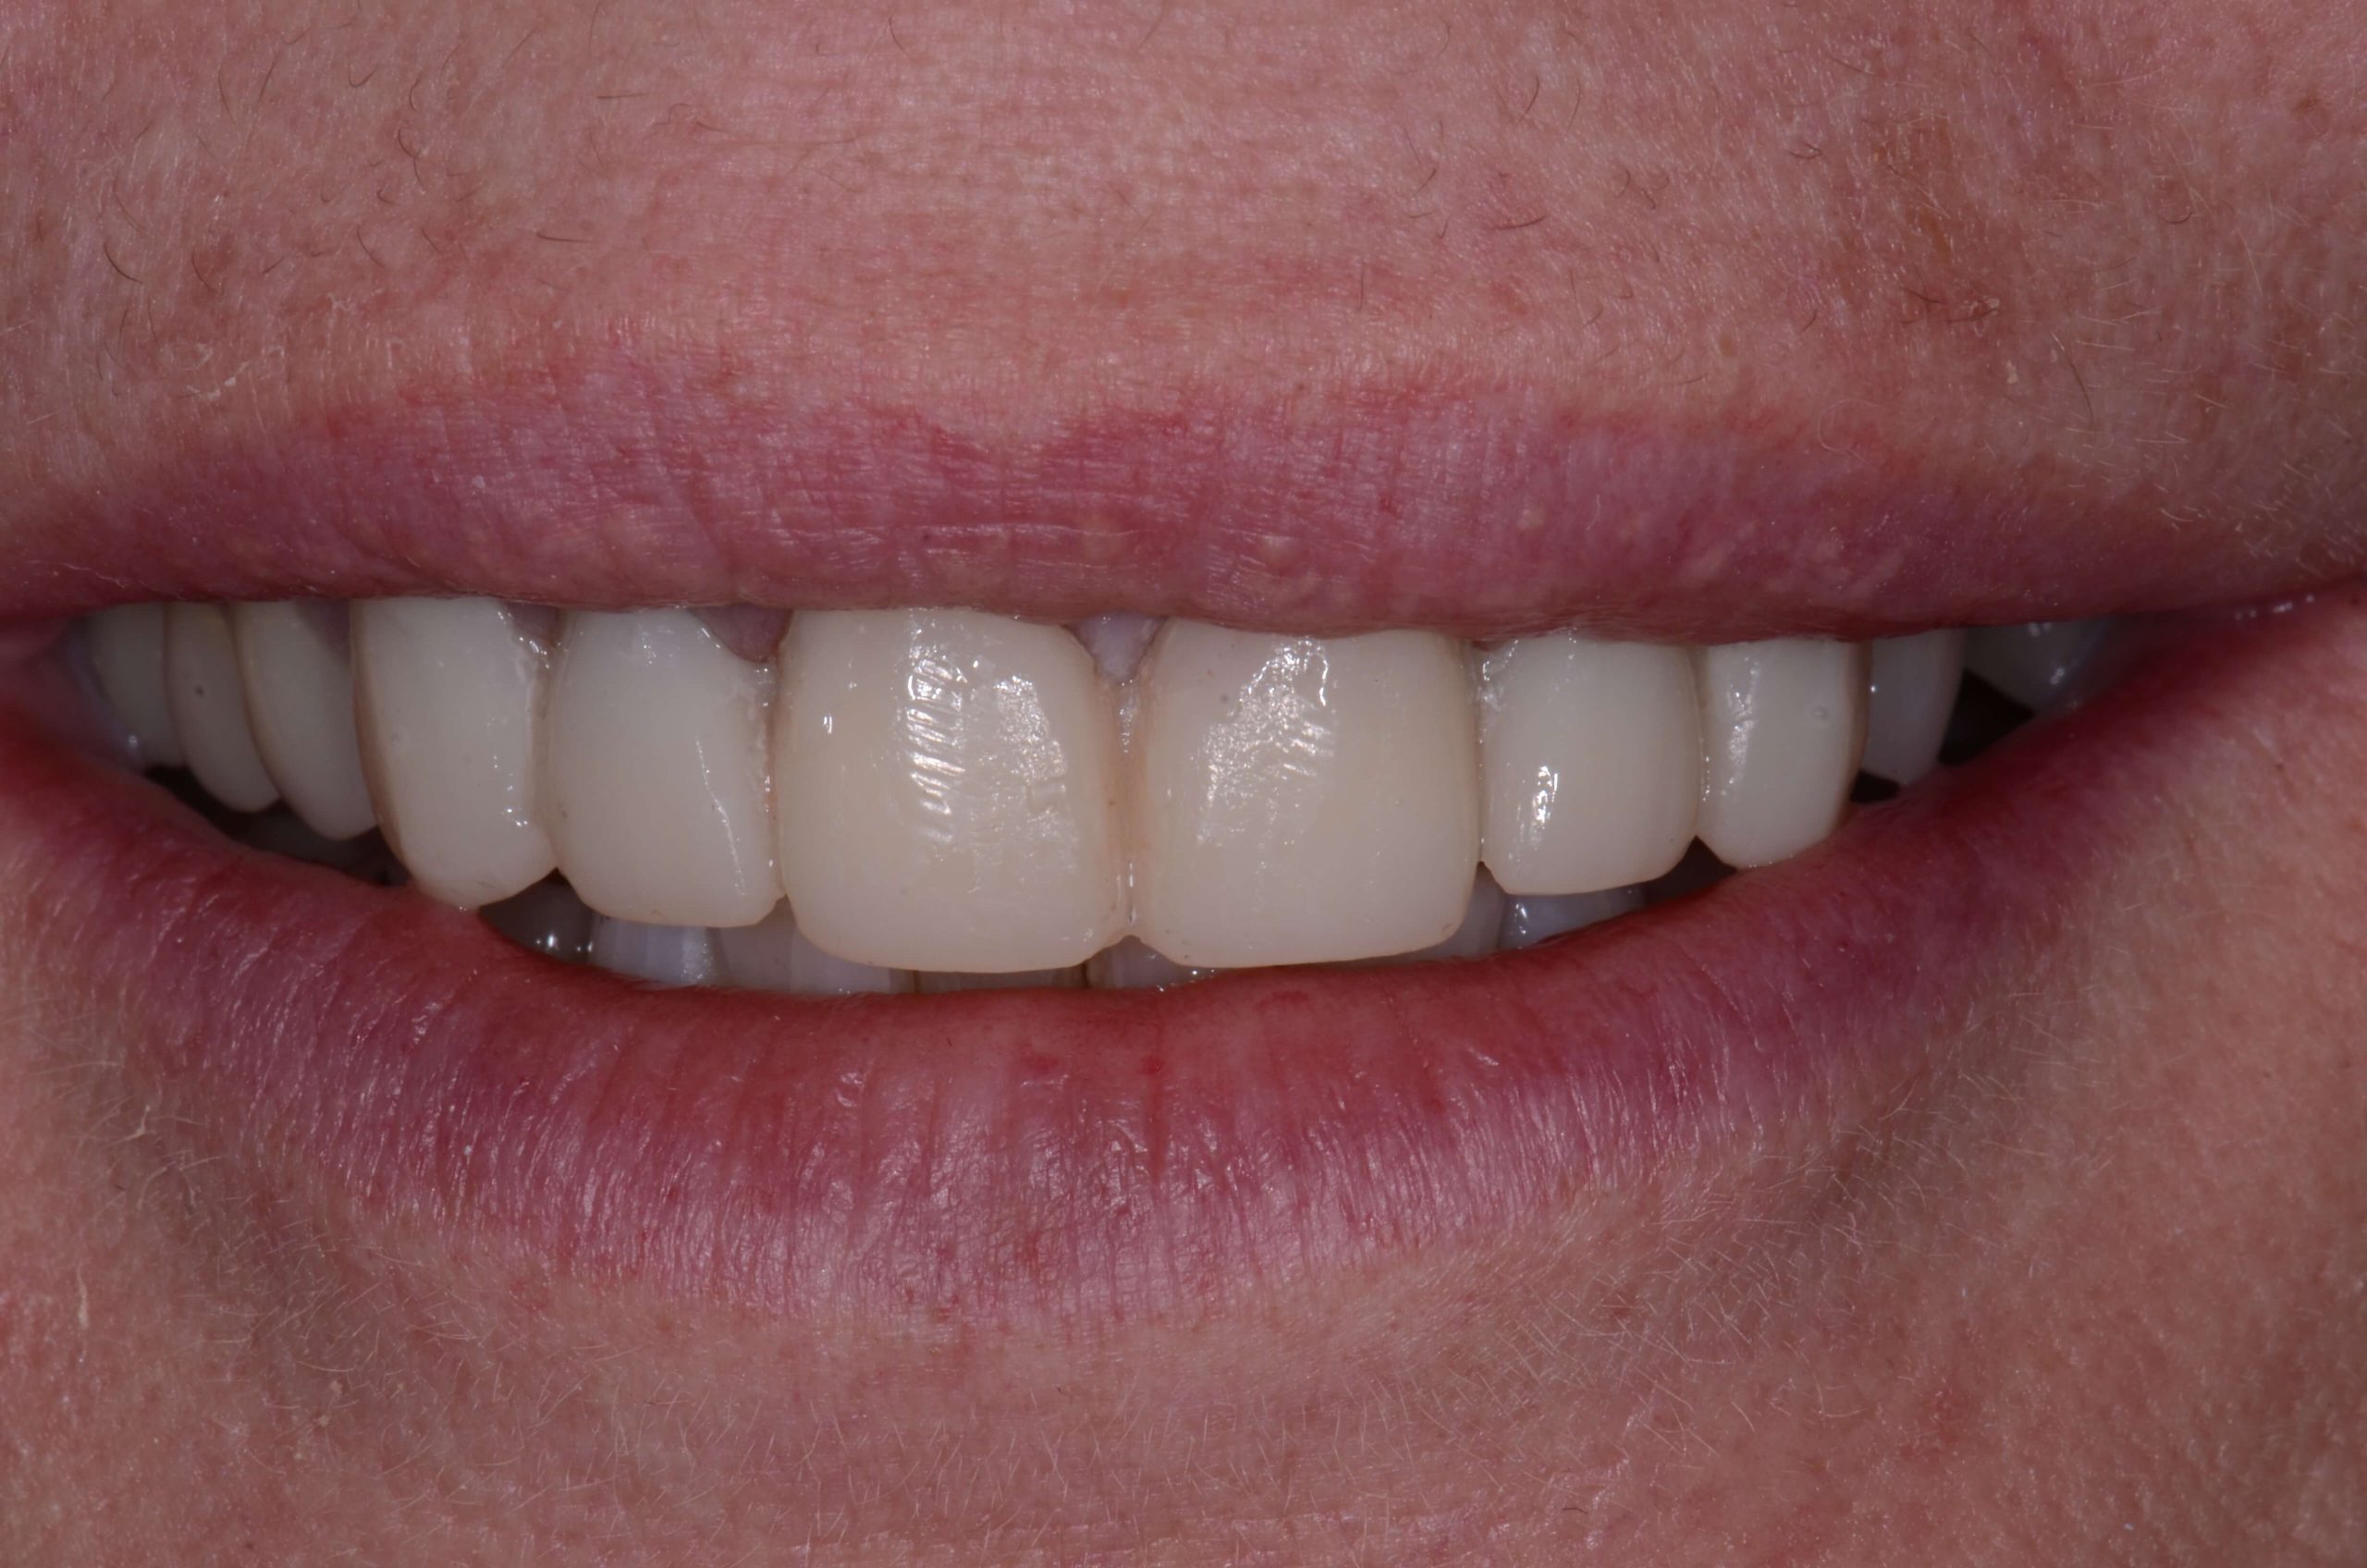
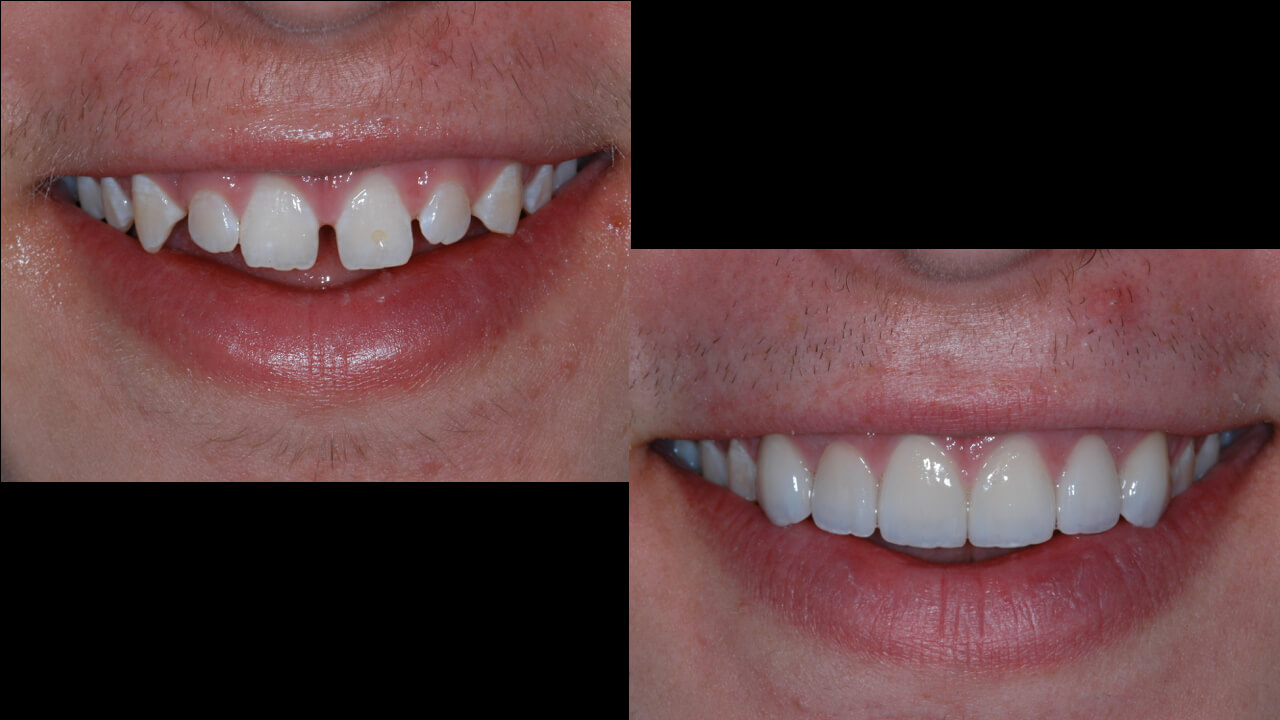
Restorations are the foundation of a thriving dental practice because they keep you challenged and motivated while ensuring patient satisfaction. Indirect bonded anterior restorations provide patients with functional and aesthetic solutions to improve their smiles.

But “veneers” are more complicated than they seem when you see the finished product: bonded anterior restorations.

Before you decide on the type of restoration you are going to offer your patients in the anterior region, here are four questions you should be asking to get the most from your restorative process:

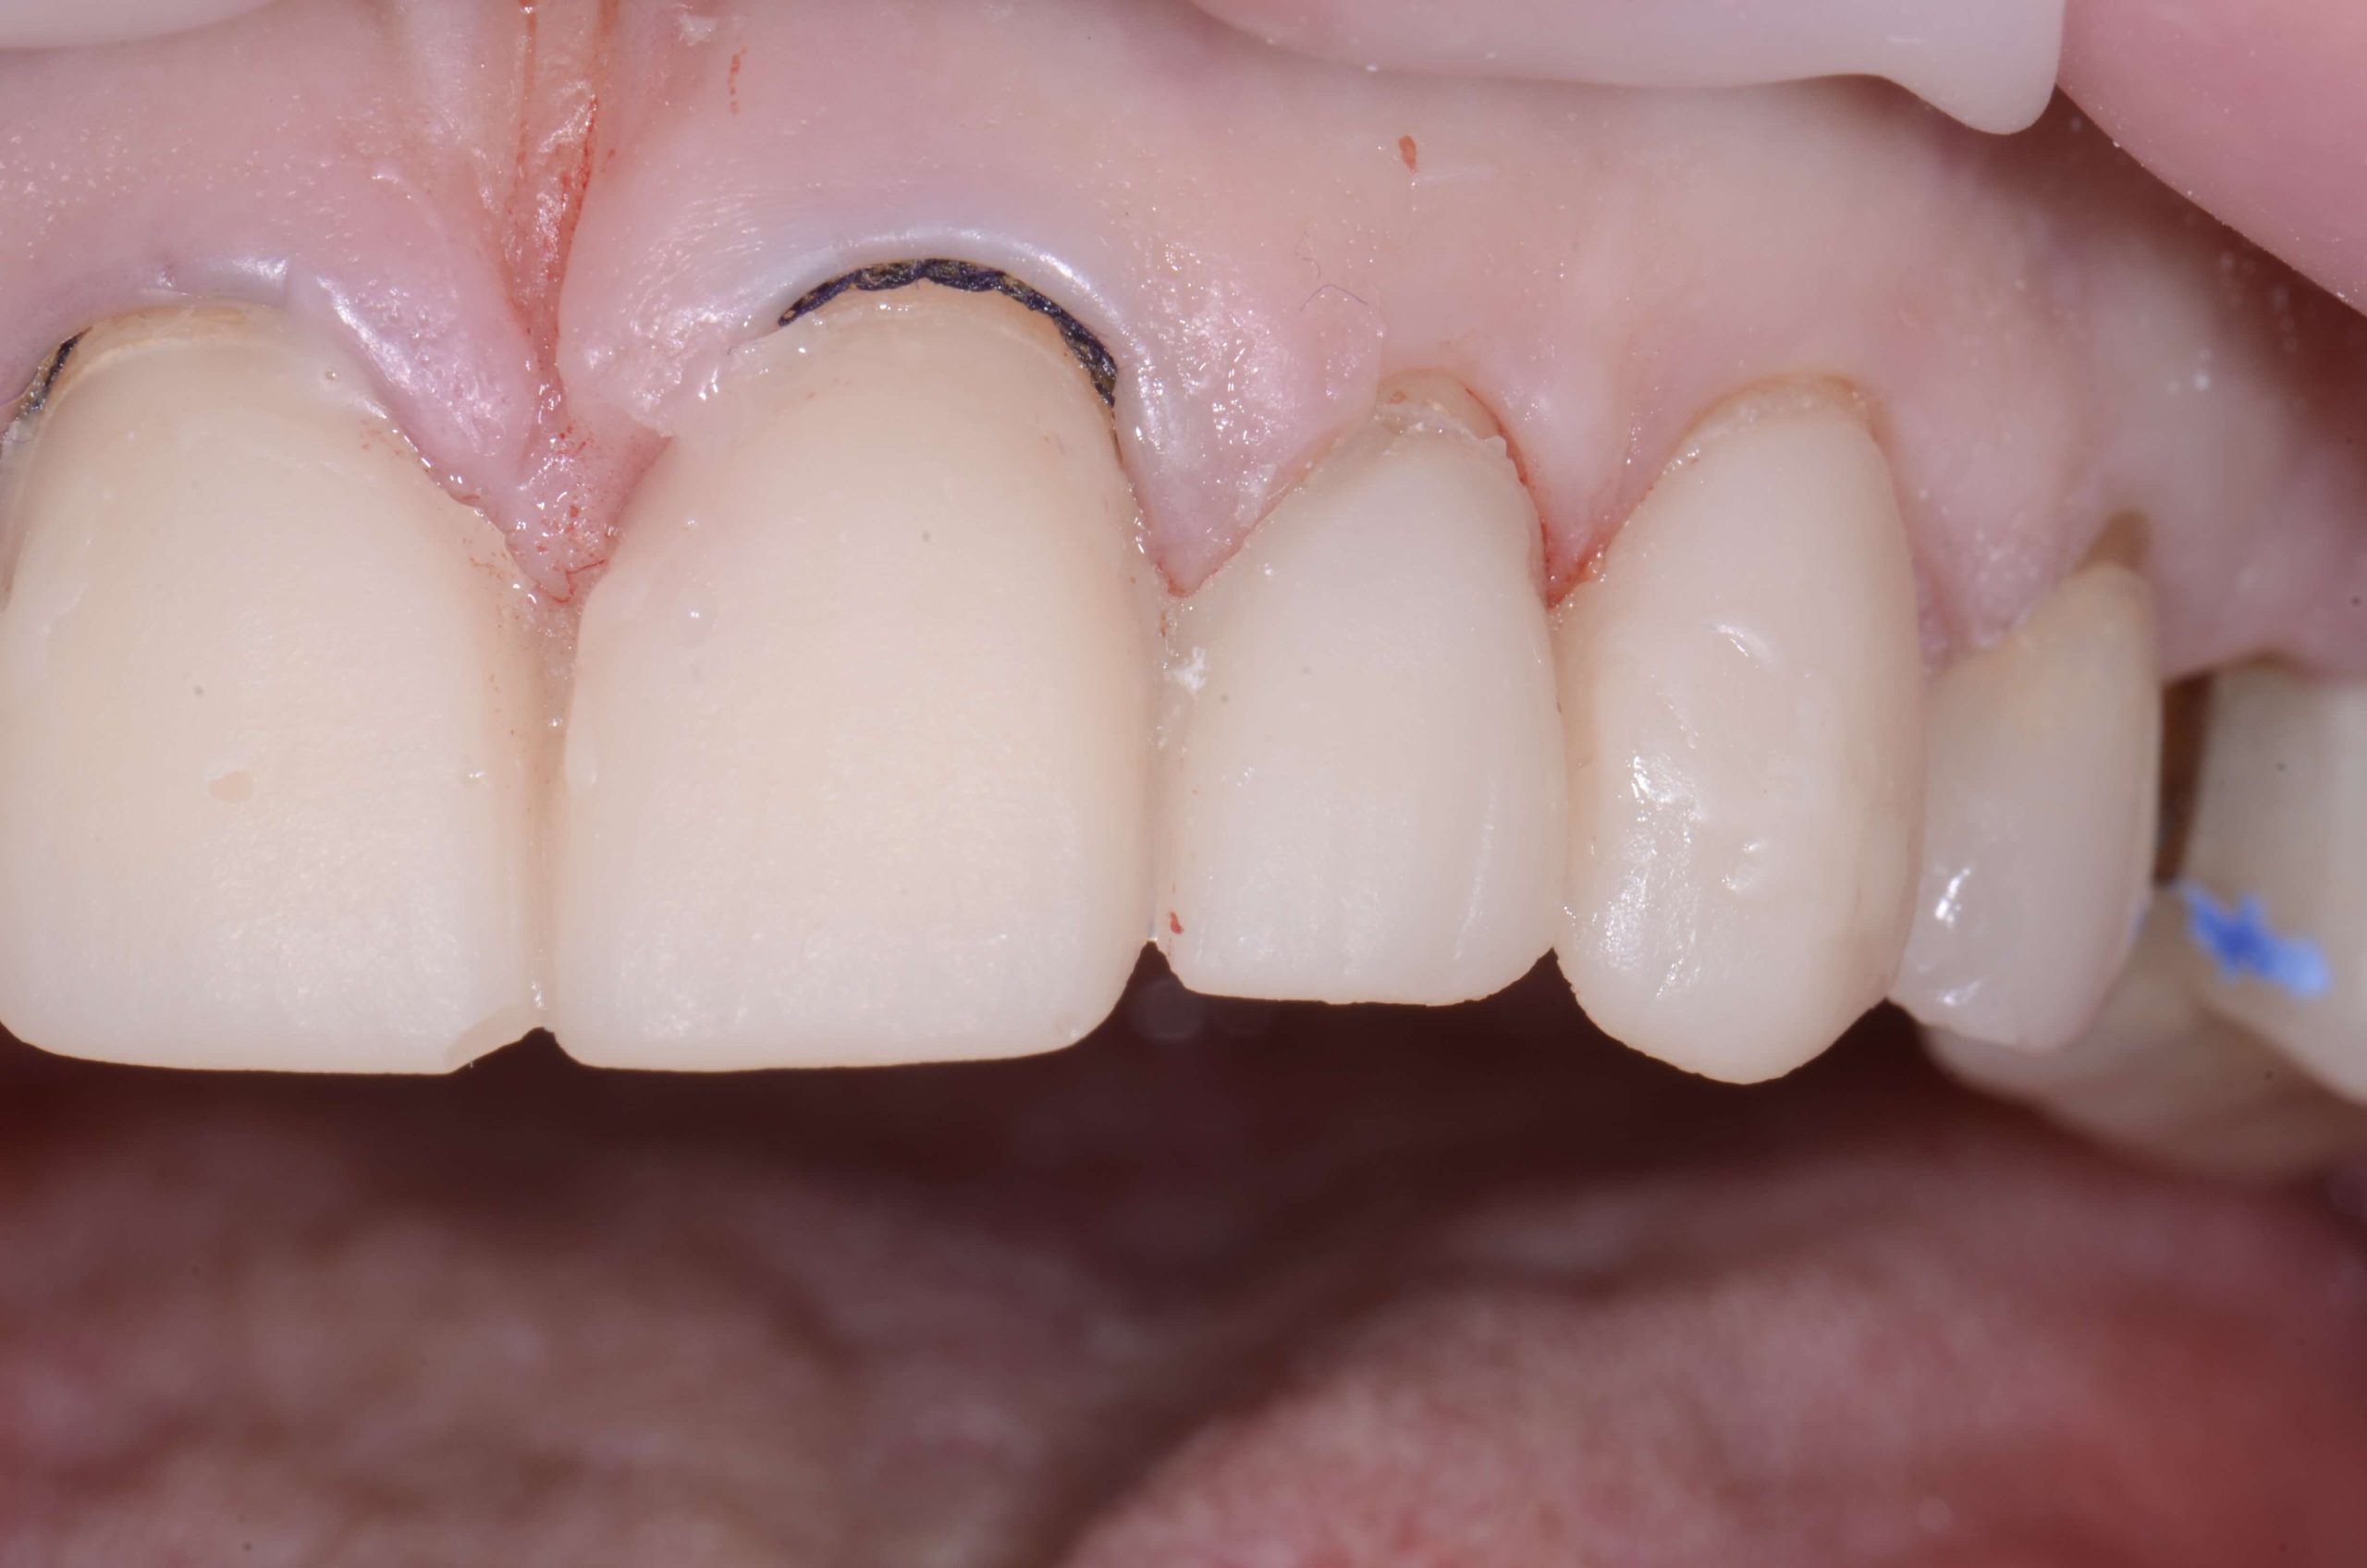
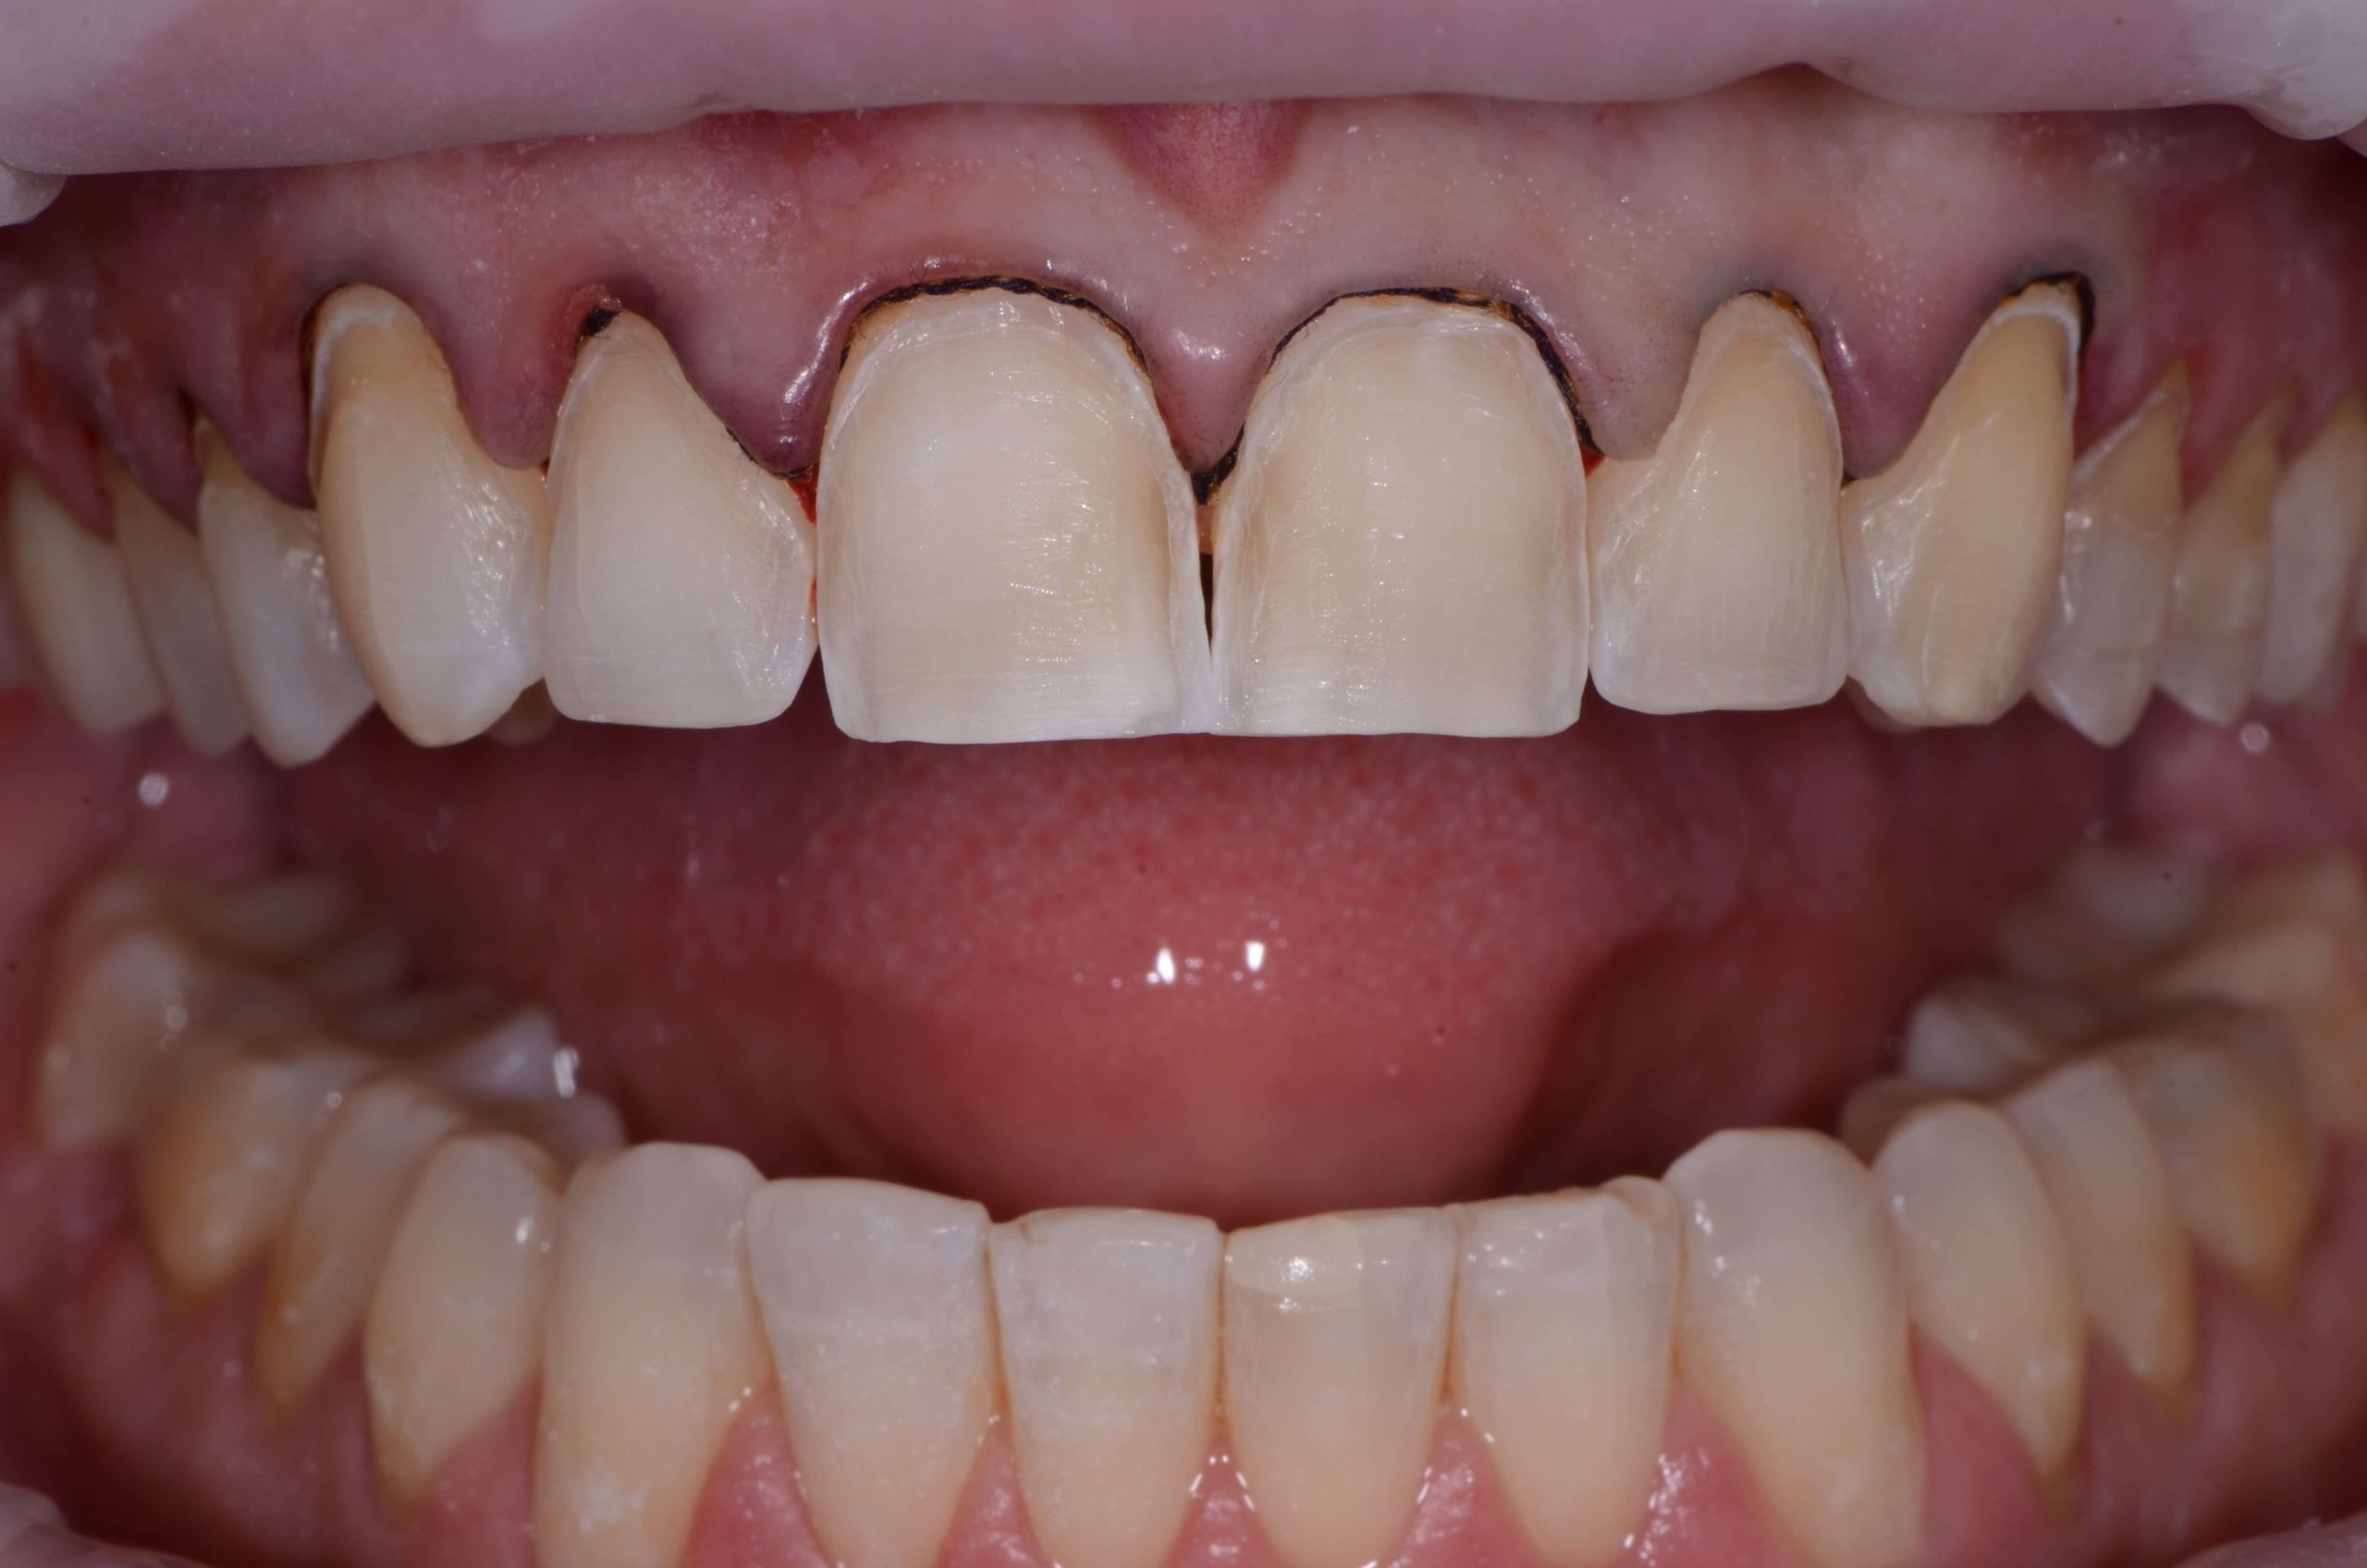
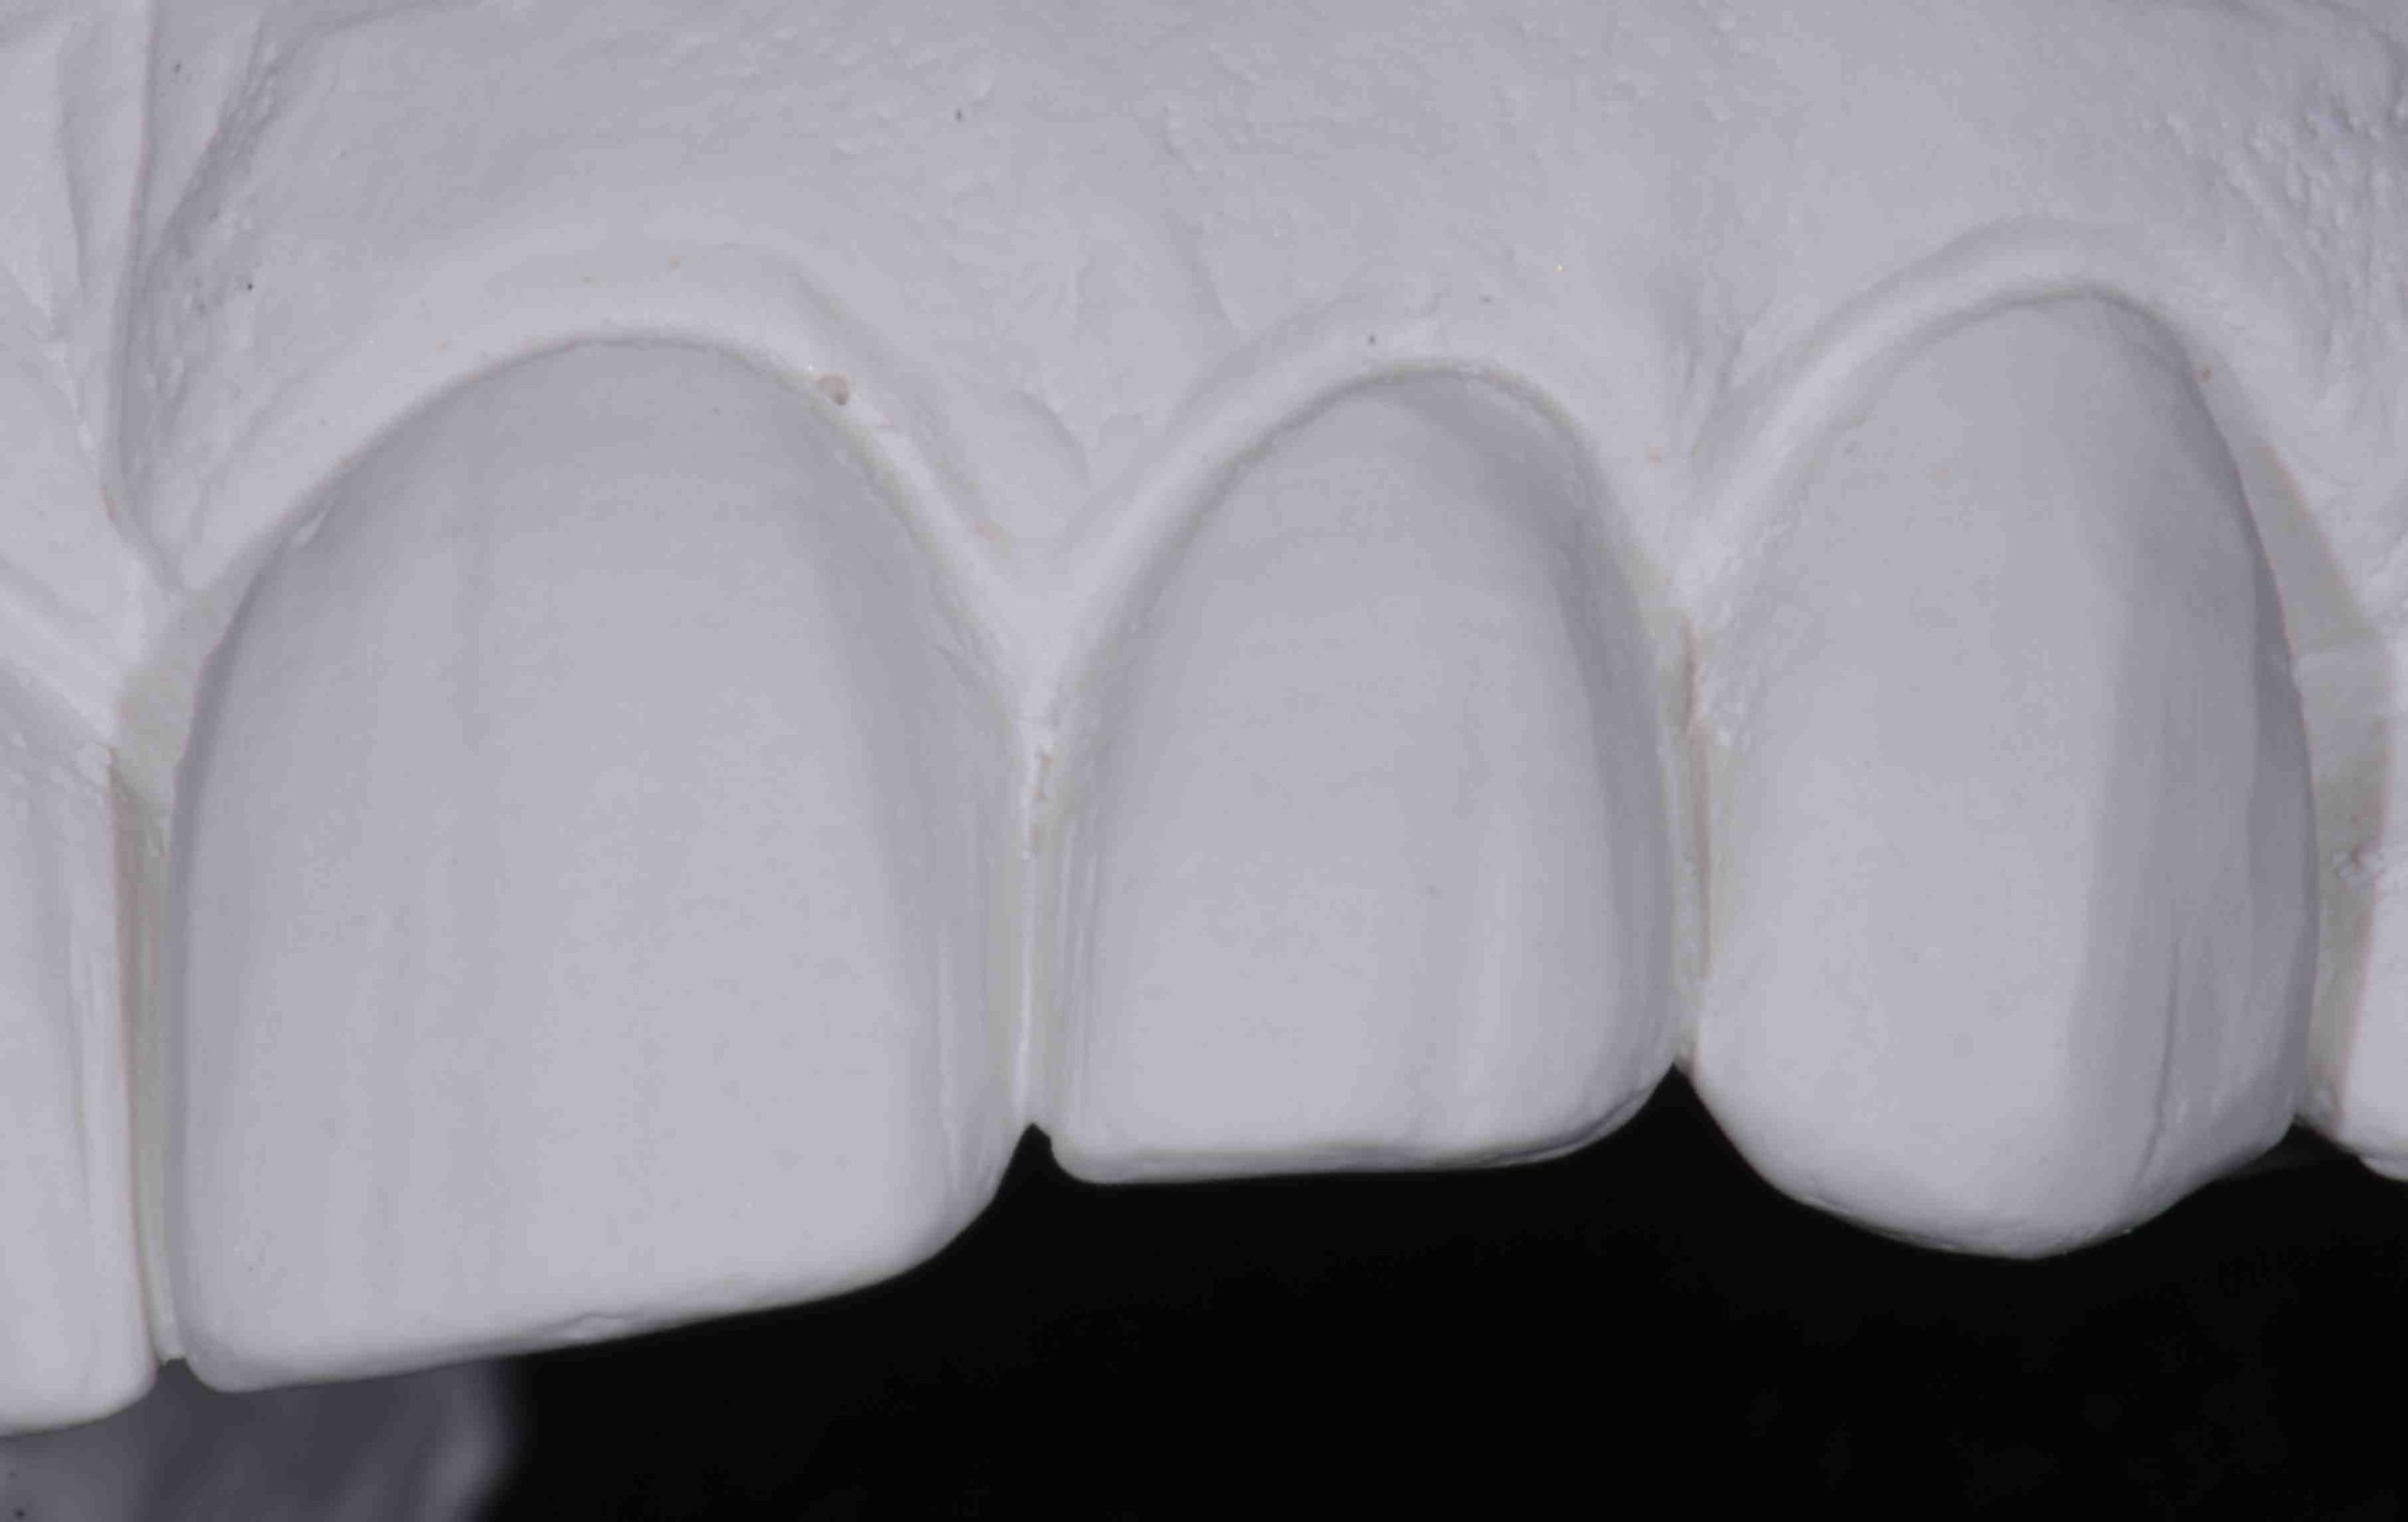
  1. Can indirect bonded anterior restorations strengthen worn-down, eroded, or chipped teeth?
  2. Should teeth be whitened before they are veneered?
  3. Should endodontically treated teeth be veneered?
  4. Are crowns stronger than veneers?

If you are hungry for more guidance on indirect bonded anterior restorations, check out my upcoming course at Pankey Online. On Friday, August 20th, 2021, from 2-4 pm ET, I will be hosting a live, 2-hour virtual course, “Indirect Bonded Anterior Restorations.” You can easily register for my course, which provides 2 CE credits, at Pankey Online.

Join me as we discuss useful concepts like three-dimensional functional and esthetic mock-ups, provisional fabrication, preparation design for adhesive restorations, and more. See you there!

Related Course

E1: Aesthetic & Functional Treatment Planning at the Chicago Midwinter Dental Meeting

DATE: February 20 2025 @ 7:00 am - February 22 2025 @ 8:00 pm

Location: Chicago Midwinter Meeting

CE HOURS:

Transform your experience of practicing dentistry, increase predictability, profitability and fulfillment. The Essentials Series is the Key, and Aesthetic and Functional Treatment Planning is where your journey begins.  Following a system of…

Learn More>

About Author

User Image
Abdi Sameni

Dr. Abdi Sameni, Clinical Associate Professor of Dentistry at Herman Ostrow School of Dentistry of USC, is the founder and developer of the “International Restorative Dentistry Symposium, Los Angeles.” He is a former faculty for the “esthetic selective” and the former director of the USC Advanced Esthetic Dentistry Continuum for the portion relating to indirect porcelain veneers. Dr. Sameni lectures nationally and internationally. He is a member of The American College of Dentists, OKU National Dental Honor Society and the Pierre Fauchard Academy. Dr. Sameni maintains a practice limited to restorative dentistry in West Los Angeles, California and the 2020 Pankey Institute webinar he presented on interdisciplinary treatment planning can be viewed here on YouTube.

FIND A PANKEY DENTIST OR TECHNICIAN

I AM A
I AM INTERESTED IN

VIEW COURSE CALENDAR

LuxaCrown in Clinical Practice

March 9, 2020 Lee Ann Brady DMD

LuxaCrown is a new material that was released by DMG America last year. LuxaCrown is a dual cure composite material that comes in a convenient chair-side cartridge. Because it has the physical properties of composite, it is much stronger and longer lasting than bisacryl provisional material. The manufacturer says it can last in the oral environment up to five years, maybe longer. It is stainresistant and color stable, so you can leave it in the mouth for long periods without concern that the color will change. I though it would be helpful to share the situations in which I now use LuxaCrown instead of a bisacryl material for provisionals. 

Multi-Unit Restorations 

In my own practice, I don’t use LuxaCrown for single crown preps where the provisional will be in the mouth for a couple of weeks, perhaps a month, or a little more. But, the strength of LuxaCrown and the color stability of this new composite material make it what I consider to be an incredible new clinical tool in my practice to provisionalize multiple units where there is pontic space. With LuxaCrown, I no longer need to reinforce the pontic with Ribbond or orthodontic wire. I don’t have to do anything to make sure we don’t get fracture at the connectors, because the material is strong enough and durable enough it to hold up, even long term.  

Anterior Veneers 

The other situation in which I use LuxaCrown routinely is with my shrink wrapped provisionals for anterior veneers. The strength of the material makes it more durable in a partial coverage anterior setting. And the color stability is appealing because the veneer may be in provisional for two months or three months, depending on how long it takes us to get patient approved provisionals for shape and contour that the patient really loves. Not having to worry about the color changing over time has been a huge bonus.  

Anterior Onlays 

Another situation in which I am using LuxaCrown is for partial coverage onlays in the posterior. So often we experience bisacryl onlay provisionals popping off the teeth, but LuxaCrown provisionals stay where you put them.    

Phased Dentistry 

And, I use LuxaCrown whenever I am phasing dentistry…when I am doing what I call “interim restorations” and the provisional restorations will be in the mouth multiple months before the patient receives ceramic restorations. Perhaps, the patient will be in provisionals six to 24 months while they go through orthodontics and we do final restorations in quadrants or even sextants of the mouth. Patients don’t mind having LuxaCrown in their mouths for long periods, because in addition to its stability, it polishes pristinely smooth and is glossy.   

Related Course

E2: Occlusal Appliances & Equilibration

DATE: April 6 2025 @ 8:00 am - April 10 2025 @ 2:30 pm

Location: The Pankey Institute

CE HOURS: 44

Dentist Tuition: $ 7400

Single Occupancy with Ensuite Private Bath (per night): $ 345

What if you had one tool that increased comprehensive case acceptance, managed patients with moderate to high functional risk, verified centric relation and treated signs and symptoms of TMD? Appliance…

Learn More>

About Author

User Image
Lee Ann Brady DMD

Dr. Lee Ann Brady is passionate about dentistry, her family and making a difference. She is a general dentist and owns a practice in Glendale, AZ limited to restorative dentistry. Lee’s passion for dental education began as a CE junkie herself, pursuing lots of advanced continuing education focused on Restorative and Occlusion. In 2005, she became a full time resident faculty member for The Pankey Institute, and was promoted to Clinical Director in 2006. Lee joined Spear Education as Executive VP of Education in the fall of 2008 to teach and coordinate the educational curriculum. In June of 2011, she left Spear Education, founded leeannbrady.com and joined the dental practice she now owns as an associate. Today, she teaches at dental meetings and study clubs both nationally and internationally, continues to write for dental journals and her website, sits on the editorial board of the Journal of Cosmetic Dentistry, Inside Dentistry and DentalTown Magazines and is the Director of Education for The Pankey Institute.

FIND A PANKEY DENTIST OR TECHNICIAN

I AM A
I AM INTERESTED IN

VIEW COURSE CALENDAR

Shrink Wrap Provisional Technique for Predictable Veneers: Part 4

August 24, 2018 Lee Ann Brady DMD

Creating amazing provisionals primes the patient for a positive treatment experience and ensures they’ll be content even before the final veneers. Read on for the last post in our four-part shrink wrap provisionals fabrication series:

Checking Occlusion and Polishing Shrink Wrap Provisionals

After cleaning off most of the excess from the provisional with a universal scaler, extra fine mosquito diamond, and a brownie, use the same diamond to open the linguo-gingival embrasures with the intent that the patient should be able to pass floss through them. This also keeps the tissue as healthy as possible for the seat later on.

Now that you’ve done all your flash trim, you should check the protrusive and right and left excursive occlusion, making sure you have even marks and no fremitus. Check intercuspal position to ensure you have no fremitus there as well, either lying back or with the patient in the alert feeding position.

With everything trimmed and ready to go, the last step is simply to polish. You can use the Brasseler Featherlite porcelain polishing system running in a latch handpiece. Utilize the first of three polishers at about 15,000 RMP, then move to the second polisher at about 10,000 RPM. They can be run at a higher speed, but you’ll get way fewer uses out of the polishers. Finally, run the last of the three polishers at about 7,000 RPM.

If you notice a porosity after cleaning out the residue from the polishing, you can use a Venus Diamond flowable that matches the esthetics of the bisacryl exactly. Fill the void by manipulating the side of the explorer to drag away excess and feather it out. Then simply light cure so that food doesn’t pack into the void.

The final step of this shrink wrap technique is to use Dialite polishing paste from Brasseler in an impregnated bristle brush to create a perfectly smooth finish. The entire process of provisionalization should take no more than about fifteen minutes.


The Shrink Wrap Technique is taught in our hands on course Excellence in Bonded Porcelain.

Related Course

Surgically Facilitated Orthodontic Therapy: An Interdisciplinary Approach

DATE: April 26 2024 @ 2:00 pm - April 26 2024 @ 4:00 pm

Location: Online

CE HOURS: 2

Surgically Facilitated Orthodontic Therapy: An Interdisciplinary Approach Patients seeking ideal esthetics may require a more sophisticated diagnosis and treatment plan than what restorative dentistry or conventional orthodontic treatment may offer…

Learn More>

About Author

User Image
Lee Ann Brady DMD

Dr. Lee Ann Brady is passionate about dentistry, her family and making a difference. She is a general dentist and owns a practice in Glendale, AZ limited to restorative dentistry. Lee’s passion for dental education began as a CE junkie herself, pursuing lots of advanced continuing education focused on Restorative and Occlusion. In 2005, she became a full time resident faculty member for The Pankey Institute, and was promoted to Clinical Director in 2006. Lee joined Spear Education as Executive VP of Education in the fall of 2008 to teach and coordinate the educational curriculum. In June of 2011, she left Spear Education, founded leeannbrady.com and joined the dental practice she now owns as an associate. Today, she teaches at dental meetings and study clubs both nationally and internationally, continues to write for dental journals and her website, sits on the editorial board of the Journal of Cosmetic Dentistry, Inside Dentistry and DentalTown Magazines and is the Director of Education for The Pankey Institute.

FIND A PANKEY DENTIST OR TECHNICIAN

I AM A
I AM INTERESTED IN

VIEW COURSE CALENDAR

Shrink Wrap Provisional Technique for Predictable Veneers: Part 3

August 22, 2018 Lee Ann Brady DMD

Utilizing the shrink wrap technique for predictable veneers necessitates careful attention to materials selection and silicone matrix creation. Once you have created the matrix, cleaned the preps, and fully seated the matrix, you can use a 2 x 2 soaked thoroughly in rubbing alcohol to wipe across and remove the air-inhibited layer.

Cleaning Up the Veneers Preparation

Because of the matrix with the silicone gasket, almost all of the excess matrix material should flake off with a universal scaler. That’s why this technique works perfectly for preps with equigingival or supragingival margins. It works less well if you have a subgingival margin because the gasket separates the silicone right at the level of the existing free gingival margin.

On the lingual, you will have a very thin film of excess material sitting over the unprepared portion of the tooth. You can peel it off using the scaler. These provisionals are not easy to pull off or dislodge from the teeth. That means you don’t have to be cautious. The material will separate as if it has been perforated right where the margin was.

After the use of a universal scaler, you can check all the margins. You’ll realize you have virtually no excess. You can then utilize an extra fine mosquito diamond at 20,000 rpm dry in the speed reduction Brasseler NSK high speed attachment. You should open the facial gingival embrasures so the patient can get floss through them. This will lead to healthy gingival tissues that aren’t inflamed on the day of the seat.

Now switch to a brownie silicone point running dry at 10,000 to 20,000 rpm. A brownie at this speed will cut any kind of resin to create a perfect infinity margin right where the lingual reduction is on the preparations and remove any excess.

What common provisionals technique do you prefer for veneers? To be continued … 


The Shrink Wrap Technique is taught in our hands on course Excellence in Bonded Porcelain.

Related Course

Mastering Dental Photography: From Start to Finish

DATE: October 10 2024 @ 8:00 am - October 12 2024 @ 2:00 pm

Location: The Pankey Institute

CE HOURS: 21

Dentist Tuition: $ 2495

Single Occupancy with Ensuite Private Bath (per night): $ 290

Dental photography is an indispensable tool for a high level practice. We will review camera set-up and what settings to use for each photo. All photos from diagnostic series, portraits,…

Learn More>

About Author

User Image
Lee Ann Brady DMD

Dr. Lee Ann Brady is passionate about dentistry, her family and making a difference. She is a general dentist and owns a practice in Glendale, AZ limited to restorative dentistry. Lee’s passion for dental education began as a CE junkie herself, pursuing lots of advanced continuing education focused on Restorative and Occlusion. In 2005, she became a full time resident faculty member for The Pankey Institute, and was promoted to Clinical Director in 2006. Lee joined Spear Education as Executive VP of Education in the fall of 2008 to teach and coordinate the educational curriculum. In June of 2011, she left Spear Education, founded leeannbrady.com and joined the dental practice she now owns as an associate. Today, she teaches at dental meetings and study clubs both nationally and internationally, continues to write for dental journals and her website, sits on the editorial board of the Journal of Cosmetic Dentistry, Inside Dentistry and DentalTown Magazines and is the Director of Education for The Pankey Institute.

FIND A PANKEY DENTIST OR TECHNICIAN

I AM A
I AM INTERESTED IN

VIEW COURSE CALENDAR

Shrink Wrap Provisional Technique for Predictable Veneers: Part 2

August 20, 2018 Lee Ann Brady DMD

Provisionals are an important part of veneers fabrication that requires just as much care and diligence as the final restoration. After acquiring diagnostic and lab records and fabricating a silicone matrix, the next step is to clean the preps with a dilute solution of 2% chlorhexidine prep scrub. Use a syringe tip with a fuzzy end for optimal brushing.

Cleaning the Veneer Preps and Loading the Matrix

The latter process ensures you start off with clean, bacteria-free preps. Rinse off the chlorhexidine and thoroughly dry the preps. With this technique you should spot-etch utilizing 35% phosphoric acid for a 3mm diameter spot on the facial or labial of the teeth.

Keep the etch far away from the margins and interproximals. Leave it for 30 seconds, rinse off, and vigorously dry the preparations. You can use an air/water syringe because a little contamination is fine.

You should then apply GLUMA from Kulzer to every prep, which is a combination of antimicrobial glutaraldehyde and HEMA that prevents tooth sensitivity. The GLUMA excess is dried with cotton to prevent it from getting in saliva or mucous membranes.

Now that teeth are ready, you can load the silicone matrix with a bisacryl material. Load the matrix by moving back and forth along the incisal edge and adding layers to minimize the incorporation of air bubbles. Fully seat it. One of the tricks with this matrix is the very flat occlusal table so you can apply even pressure. Additionally, adequate thickness of the silicone provides rigidity and accuracy with less trim needed.

Let the material stay in the mouth for the full set time, which is a little over four minutes. At that point, remove the matrix for completely hard bisacryl on the teeth.

To be continued …


The Shrink Wrap Technique is taught in our hands on course Excellence in Bonded Porcelain.

Related Course

E3: Restorative Integration of Form & Function

DATE: January 12 2025 @ 8:00 am - January 16 2025 @ 2:30 pm

Location: The Pankey Institute

CE HOURS: 41

Dentist Tuition: $ 7400

Single Occupancy with Ensuite Private Bath (per night): $ 345

THIS COURSE IS SOLD OUT Understanding that “form follows function” is critical for knowing how to blend what looks good with what predictably functions well. E3 is the phase of…

Learn More>

About Author

User Image
Lee Ann Brady DMD

Dr. Lee Ann Brady is passionate about dentistry, her family and making a difference. She is a general dentist and owns a practice in Glendale, AZ limited to restorative dentistry. Lee’s passion for dental education began as a CE junkie herself, pursuing lots of advanced continuing education focused on Restorative and Occlusion. In 2005, she became a full time resident faculty member for The Pankey Institute, and was promoted to Clinical Director in 2006. Lee joined Spear Education as Executive VP of Education in the fall of 2008 to teach and coordinate the educational curriculum. In June of 2011, she left Spear Education, founded leeannbrady.com and joined the dental practice she now owns as an associate. Today, she teaches at dental meetings and study clubs both nationally and internationally, continues to write for dental journals and her website, sits on the editorial board of the Journal of Cosmetic Dentistry, Inside Dentistry and DentalTown Magazines and is the Director of Education for The Pankey Institute.

FIND A PANKEY DENTIST OR TECHNICIAN

I AM A
I AM INTERESTED IN

VIEW COURSE CALENDAR

Shrink Wrap Provisional Technique for Predictable Veneers: Part 1

August 17, 2018 Lee Ann Brady DMD

Of all the methods commonly used for veneer provisionalization, my favorite has to be the shrink wrap technique. I love it and use it all the time because in my opinion it is the easiest and most predictable method.

The term ‘shrink wrap’ comes from allowing polymerization shrinkage of the material to lock bisacryl onto the preparation. The main advantage of this approach is that it keeps veneer provisionals firmly secured until the final restoration can be placed.

Here’s my take on utilizing this technique in the dental practice:

Predictable Veneers with Shrink Wrap Provisionals

The first step of shrink wrap provisionals is to prepare the teeth. Let’s imagine you are dealing with a patient who experienced trauma such as breaking their teeth in a bicycle accident.

Before beginning the technique, make sure you have all the diagnostic records you need, including all prep records for the lab: facebow, opposing model, final impressions (maybe more than one) with good flash, etc. Once you provisionalize the teeth, it won’t be easy to get access to the preps again.

One of the essential parts of a shrink wrap provisional technique is fabrication of a silicone matrix with a silicone gasket to separate the excess. You should begin with a solid model either of the teeth before they are prepared or of the wax-up. You can carve a 1 mm deep trench into the wax-up by using the cleoid end of a cleoid/discoid.

Put the sharp pointy end right on the free gingival margin of the gingival of the tooth on the model to carve. You can even go a little deeper in the interproximals. Now take that model and fabricate a two stage silicone matrix.

First, create a putty matrix and trim it. Then, load the putty with the light body of the same impression system, reseat on the model, allow it to achieve a full set, and trim. Now you are ready to go to the patient and use lip retractors. Remember to add a little vaseline or lubricant to the lips for comfort.

At this point, I like to use the OptraGate from Ivoclar Vivadent for a latex free retraction device that can handle anything in the anterior. I will have it in during preparation and for impressions so I don’t have to hold the lip out of the way.

To be continued …


The Shrink Wrap Technique is taught in our hands on course Excellence in Bonded Porcelain.

Related Course

E1: Aesthetic & Functional Treatment Planning

DATE: July 17 2025 @ 8:00 am - July 20 2025 @ 2:30 pm

Location: The Pankey Institute

CE HOURS: 39

Dentist Tuition: $ 6800

Single Occupancy with Ensuite Private Bath (Per Night): $ 345

Transform your experience of practicing dentistry, increase predictability, profitability and fulfillment. The Essentials Series is the Key, and Aesthetic and Functional Treatment Planning is where your journey begins.  Following a system of…

Learn More>

About Author

User Image
Lee Ann Brady DMD

Dr. Lee Ann Brady is passionate about dentistry, her family and making a difference. She is a general dentist and owns a practice in Glendale, AZ limited to restorative dentistry. Lee’s passion for dental education began as a CE junkie herself, pursuing lots of advanced continuing education focused on Restorative and Occlusion. In 2005, she became a full time resident faculty member for The Pankey Institute, and was promoted to Clinical Director in 2006. Lee joined Spear Education as Executive VP of Education in the fall of 2008 to teach and coordinate the educational curriculum. In June of 2011, she left Spear Education, founded leeannbrady.com and joined the dental practice she now owns as an associate. Today, she teaches at dental meetings and study clubs both nationally and internationally, continues to write for dental journals and her website, sits on the editorial board of the Journal of Cosmetic Dentistry, Inside Dentistry and DentalTown Magazines and is the Director of Education for The Pankey Institute.

FIND A PANKEY DENTIST OR TECHNICIAN

I AM A
I AM INTERESTED IN

VIEW COURSE CALENDAR

Case Study: All Porcelain Restorations

February 20, 2018 Glenda Owen DDS

Dive into this case for a look at Dr. Owen’s thought process and treatment protocol leading to porcelain restorations. 

Angela was 27 when she came to us asking about options to improve her smile. She was getting married within a year. She hated the appearance of the bridge #3-6 that had been placed in high school. It was repaired at the buccal margin of #6 the day of delivery. She also said she wanted to avoid implants because of time issues and she didn’t want more crowns.

Patient Background

Angela was congenitally missing #4, 7, 10, 12, 13, 20, and 29. In the past, she had implants to replace the lower bicuspids and said the process took too long. Her previous dentist had placed two upper bridges – #3-7 with pontics on #4 and #7 and #14-10 with pontics on #13 and #10. The space for #12 did not exist.


Treatment Plan

I noticed her narrow central incisors compared to her laterals and the general contour and color of the bridges. I knew we could improve her smile with all porcelain restorations. Implants to replace missing teeth and veneers on the centrals would make a difference. We did a wax up that she took home to study, comparing it to the model of her existing restorations. She visited the periodontist who would do the implants and I showed her lots of photos of other cases similar to hers.

Creating Porcelain Restorations

Ultimately Angela agreed with our plan. She had implants replacing #7, 10, and 13. We used Zirconia abutments and e.max crowns, as well as an e.max crown for #14. She opted for a Zirconia bridge #3-5. While she was healing, we made provisional bridges, including the cantilevers for the laterals. She was hesitant about the veneers on #8 and #9, but before we began I removed the bridges and created a trial restoration with the wider veneers and proper bridge contours. I took photos and let her think about it before she agreed. She got married with a beautiful new smile.   

What interesting cases are you currently working on? 

Related Course

E3: Restorative Integration of Form & Function

DATE: January 12 2025 @ 8:00 am - January 16 2025 @ 2:30 pm

Location: The Pankey Institute

CE HOURS: 41

Dentist Tuition: $ 7400

Single Occupancy with Ensuite Private Bath (per night): $ 345

THIS COURSE IS SOLD OUT Understanding that “form follows function” is critical for knowing how to blend what looks good with what predictably functions well. E3 is the phase of…

Learn More>

About Author

User Image
Glenda Owen DDS

Dr. Glenda Owen practices in Houston, Texas where she lives with her husband Kevin. She is a graduate of the University of Texas Dental Branch in Houston. Dr. Owen is a faculty member and member of the Board of Directors for The Pankey Institute.

FIND A PANKEY DENTIST OR TECHNICIAN

I AM A
I AM INTERESTED IN

VIEW COURSE CALENDAR

Case Report: Ceramic Veneers & Invisalign Part One

January 2, 2018 Mike Crete DDS

Dr. Crete discusses an anterior esthetic case from the initial conversation to finished treatment plan for a patient who lacked smile confidence.

Patient Profile

Drew became a new patient at my practice as a 20-year-old junior in college. His reasoning was: “Just to get my teeth cleaned.” During his initial hygiene appointment, he mentioned the “spot” on his front tooth (#9 – small pit filled with composite 10 years prior).  

He asked: “Can you put some new bond on there and make it match better? Even when my dentist did it the first time, it was always obvious.”

I heard his question as a window to ask further questions and find out a little bit more about him. At Pankey, we call this, ‘knowing your patient.’ It can start with an introduction to a new patient during a hygiene examination.  

Asking the Right Questions for Case Acceptance

I began by asking, “Do you know why you had the bonding done?” and “Did you have a cavity?”  

His answer was, “No, I have been playing hockey since I was really little. I was not always good about wearing my mouth guard and I chipped my teeth a lot.”   

Further questioning revealed he was referring to the enhanced mamelons and pitted enamel areas of his anterior teeth as “chips.”

His parents had elected not to have the chips repaired because they were told it was cosmetic treatment and their insurance would likely not pay anything.  

The Value of Open Dialogue

I then asked a few more open-ended questions like, “Is there anything about your smile you would change?”  

His answer: “Well, I always feel like I have little teeth and it makes me look like a little kid. I wanted braces when I was in junior high but my dentist told me I had a good bite and braces wouldn’t fix all the spaces I have.”  

Further dialogue with Drew revealed a significant concern he had about graduating from business school in a year and having to go through interviews looking like a little kid. He said, ”I worry no one will want to hire me because I look so young.”

To be continued…

Related Course

Pankey Scholar 14B

DATE: August 15 2024 @ 6:00 pm - August 17 2024 @ 3:00 pm

Location: The Pankey Institute

CE HOURS: 0

Dentist Tuition: $ 3905

Single Occupancy with Ensuite Private Bath (per night): $ 290

“A Pankey Scholar is one who has demonstrated a commitment to apply the principles, practices and philosophy they learned through their journey at The Pankey Institute.”   At its core,…

Learn More>

About Author

User Image
Mike Crete DDS

Dr. Mike Crete lives and practices in Grand Rapids, MI. He graduated from the University of Michigan dental school over 30 years ago. He has always been an avid learner and dedicated to advanced continuing education., After completing the entire curriculum at The Pankey Institute, Mike returned to join the visiting faculty. Mike is an active member of the Pankey Board of Directors, teaches in essentials one and runs two local Pankey Learning Groups in Grand Rapids.

FIND A PANKEY DENTIST OR TECHNICIAN

I AM A
I AM INTERESTED IN

VIEW COURSE CALENDAR

Esthetics & Function: Incisal Edge Bevels

December 10, 2017 Lee Ann Brady DMD

There are three critical components to the incisal edge anatomy of anterior teeth. Understanding the function and esthetics of the pitch and two bevels is essential to creating an ideal patient result.

How can a clinician re-create the full anatomic form of the tooth in ceramics and composite? 

In my last blog on this topic, I discussed the dimensions, characterization, esthetics, restorative approach and challenge of mimicking ‘pitch‘ esthetics. Now, I’ll delve into mastering the bevels to create superior restorative results. Combining an esthetic pitch with functional bevels will ensure a smooth composite or ceramic outcome.

Components of Incisal Edge Anatomy Function and Esthetics: Bevels

The two bevels can be found on alternately the labial and the lingual of the transition zone between the pitch and these surfaces. They are often called the leading edge and the trailing edge.

Bevels

Dimensions: The bevels on both sides have a variable width. They can be between less than a millimeter to multiple millimeters long.

Characterization: The bevels lengthen in patients who grind their teeth in an excursive pathway pattern. Patients who parafunction edge to edge might eliminate the bevel. This makes it easier to shear enamel off on the labial or lingual side of the tooth. It also could result in chipping the edge enamel.

Function: The bevel is a transition zone to create smooth functional movement passing from excursive movements onto the pitch. Intercuspal stops on lower incisors are often on or gingival to the bevel.

Whether you are finalizing an equilibration, the occlusion on composites, or ceramics, perfecting anterior guidance is all about both pitch and bevel surfaces. These critical components are a great example of marrying form and function in your technique.

What is your restorative approach for recreating incisal edge anatomy? We’d love to hear from you in the comments! 

Related Course

E2: Occlusal Appliances & Equilibration

DATE: July 21 2024 @ 8:00 am - July 25 2024 @ 2:30 pm

Location: The Pankey Institute

CE HOURS: 44

Dentist Tuition: $ 7200

night with private bath: $ 290

What if you had one tool that increased comprehensive case acceptance, managed patients with moderate to high functional risk, verified centric relation and treated signs and symptoms of TMD? Appliance…

Learn More>

About Author

User Image
Lee Ann Brady DMD

Dr. Lee Ann Brady is passionate about dentistry, her family and making a difference. She is a general dentist and owns a practice in Glendale, AZ limited to restorative dentistry. Lee’s passion for dental education began as a CE junkie herself, pursuing lots of advanced continuing education focused on Restorative and Occlusion. In 2005, she became a full time resident faculty member for The Pankey Institute, and was promoted to Clinical Director in 2006. Lee joined Spear Education as Executive VP of Education in the fall of 2008 to teach and coordinate the educational curriculum. In June of 2011, she left Spear Education, founded leeannbrady.com and joined the dental practice she now owns as an associate. Today, she teaches at dental meetings and study clubs both nationally and internationally, continues to write for dental journals and her website, sits on the editorial board of the Journal of Cosmetic Dentistry, Inside Dentistry and DentalTown Magazines and is the Director of Education for The Pankey Institute.

FIND A PANKEY DENTIST OR TECHNICIAN

I AM A
I AM INTERESTED IN

VIEW COURSE CALENDAR

Esthetics & Function: Incisal Edge Pitch

December 8, 2017 Lee Ann Brady DMD

The incisal edge anatomy of anterior teeth is quite complex. This complexity is fundamental to the esthetics of the tooth, as well as the function of incisors. How do we re-create the full anatomic form of the tooth in ceramics and composite? 

Components of Incisal Edge Anatomy Function and Esthetics: Pitch

When the full anatomic form is not precisely recreated, this can lead to esthetic and functional challenges. To successfully mimic this form, the clinician can rely on three components of incisal edges (from a lateral perspective): 1 pitch and 2 bevels.

We can visualize the pitch as the flat top of the incisal edge.

Pitch

Dimensions: Labio-lingual width of at least 1mm that increases from attrition or parafunction in edge to edge position.

Characterization: Pitch is not always parallel to the horizon and its relative position is dependent on the inclination of the incisor. Incisors are inclined just a little bit further to the labial at the incisal edge and the pitch has an upward slant toward the lingual.

Esthetics: The tooth shape and inclination results in an incisal edge esthetic of thinner enamel at the labio-incisal junction. It also creates the highly desirable visual translucence. Leveling the pitch to the horizon can change light reflection which is critical to esthetics of the tooth.

Restorative Approach: Often in ceramics we create a pitch that is level to the horizon and has decreased width of the pitch. This can compromise the esthetics of the translucency, but that can be gained back using stains.

Challenge: The challenge with this shape change in ceramics is that patients often sit in edge to edge position during parafunction. Insufficient pitch width may result in the patient experiencing functional challenges, not finding a comfortable spot to rest and increased parafunctional movement.

I’ll expand on understanding the two bevels in my next incisal edge anatomy blog …

What aspects of incisal edge anatomy do you find most challenging? Let us know in the comments!


Related Course

E1: Aesthetic & Functional Treatment Planning

DATE: August 21 2025 @ 8:00 am - August 24 2025 @ 2:30 pm

Location: The Pankey Institute

CE HOURS: 39

Dentist Tuition: $ 6800

Single Occupancy with Ensuite Private Bath (Per Night): $ 345

Transform your experience of practicing dentistry, increase predictability, profitability and fulfillment. The Essentials Series is the Key, and Aesthetic and Functional Treatment Planning is where your journey begins.  Following a system of…

Learn More>

About Author

User Image
Lee Ann Brady DMD

Dr. Lee Ann Brady is passionate about dentistry, her family and making a difference. She is a general dentist and owns a practice in Glendale, AZ limited to restorative dentistry. Lee’s passion for dental education began as a CE junkie herself, pursuing lots of advanced continuing education focused on Restorative and Occlusion. In 2005, she became a full time resident faculty member for The Pankey Institute, and was promoted to Clinical Director in 2006. Lee joined Spear Education as Executive VP of Education in the fall of 2008 to teach and coordinate the educational curriculum. In June of 2011, she left Spear Education, founded leeannbrady.com and joined the dental practice she now owns as an associate. Today, she teaches at dental meetings and study clubs both nationally and internationally, continues to write for dental journals and her website, sits on the editorial board of the Journal of Cosmetic Dentistry, Inside Dentistry and DentalTown Magazines and is the Director of Education for The Pankey Institute.

FIND A PANKEY DENTIST OR TECHNICIAN

I AM A
I AM INTERESTED IN

VIEW COURSE CALENDAR