Capturing an Exquisite Crown & Bridge Impression

August 28, 2019 Lee Ann Brady DMD

Capturing an exquisite final impression is our goal every time. Getting this result can be one of the most challenging things we do in dentistry. In addition to being masterful in taking an impression and handling the materials, we also must manage the oral environment properly.

Improving the Gingival Tissue Prior to the Impression Appointment

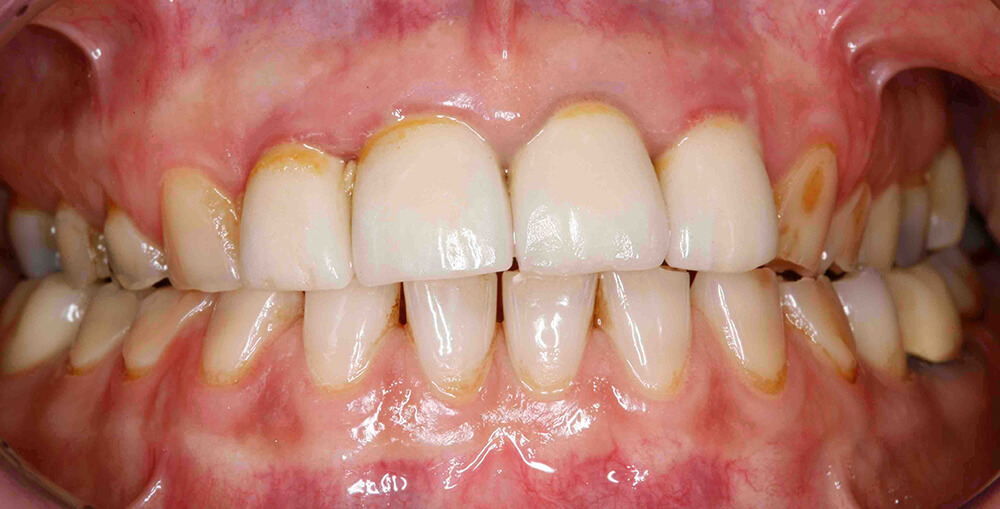
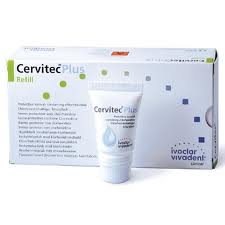
For crown and bridge impressions this process has to begin with optimal tissue management, and tissue management always begins before tooth preparation. Old restorations with poor margins often compromise hygiene with resultant irritated and inflamed gingival tissues. If the tissue is inflamed at the time, we recommend the tooth be crowned, we apply chlorhexidine varnish (Cervitec Plus – Ivoclar Vivadent). When the patient returns for impressions, tissue health is vastly improved.

Managing the Gingival Tissue for Tooth Preparation

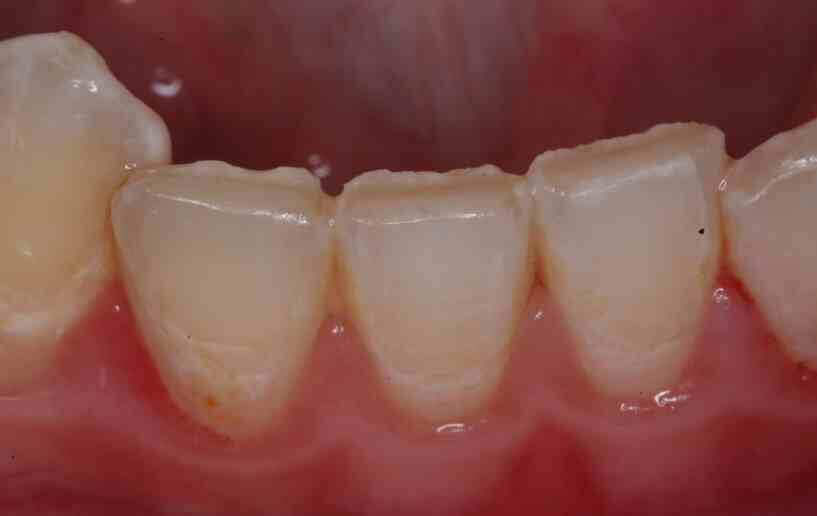
Tooth preparation itself can result in difficulty managing the tissue. My preference is always to leave margins supragingival if that is clinically appropriate. My second choice is equigingival, where the margins are right at the crest of the tissue. If the margins are to be placed subgingival, I want to avoid cutting the tissue and then having to manage bleeding. If my initial margin placement is equigingival, I place a primary cord to move the tissue out of the way. This allows me to now drop the margin subgingival with minimal trauma to the tissue.

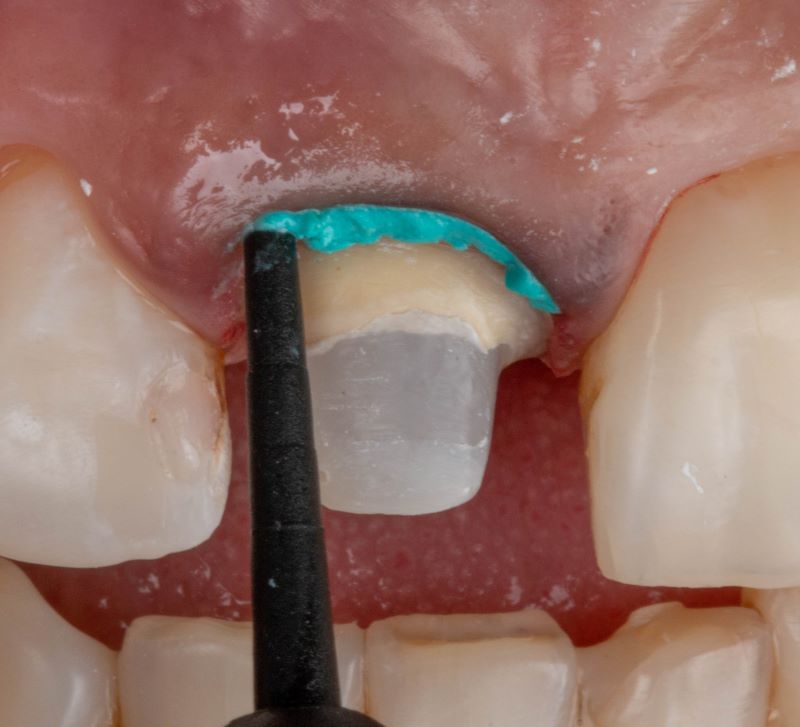
Retraction of the Gingival Tissue for the Impression

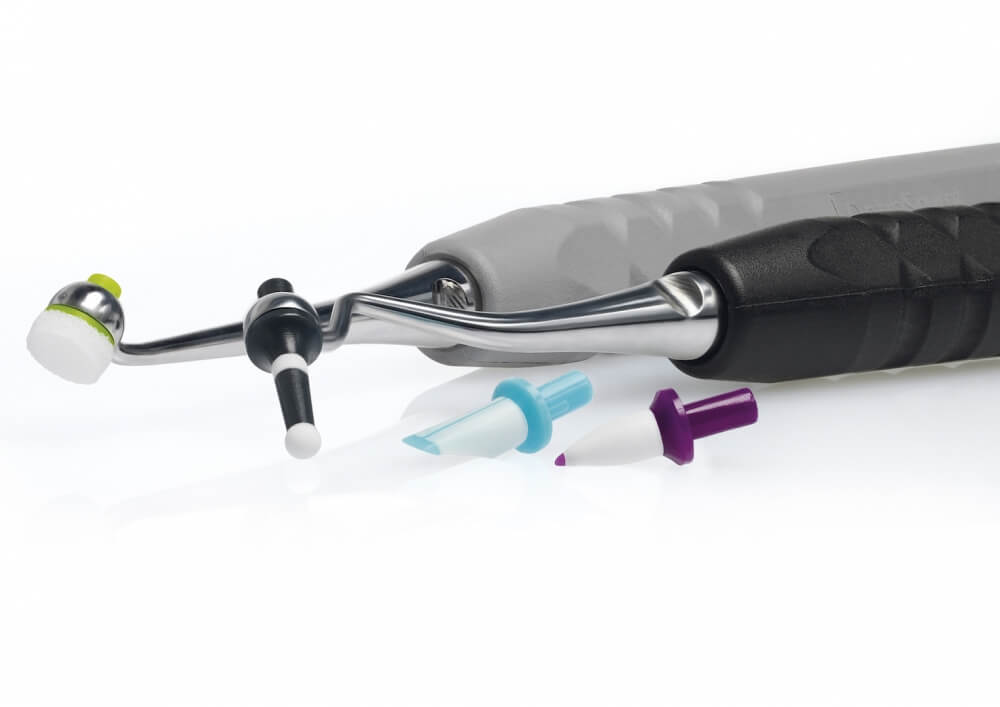
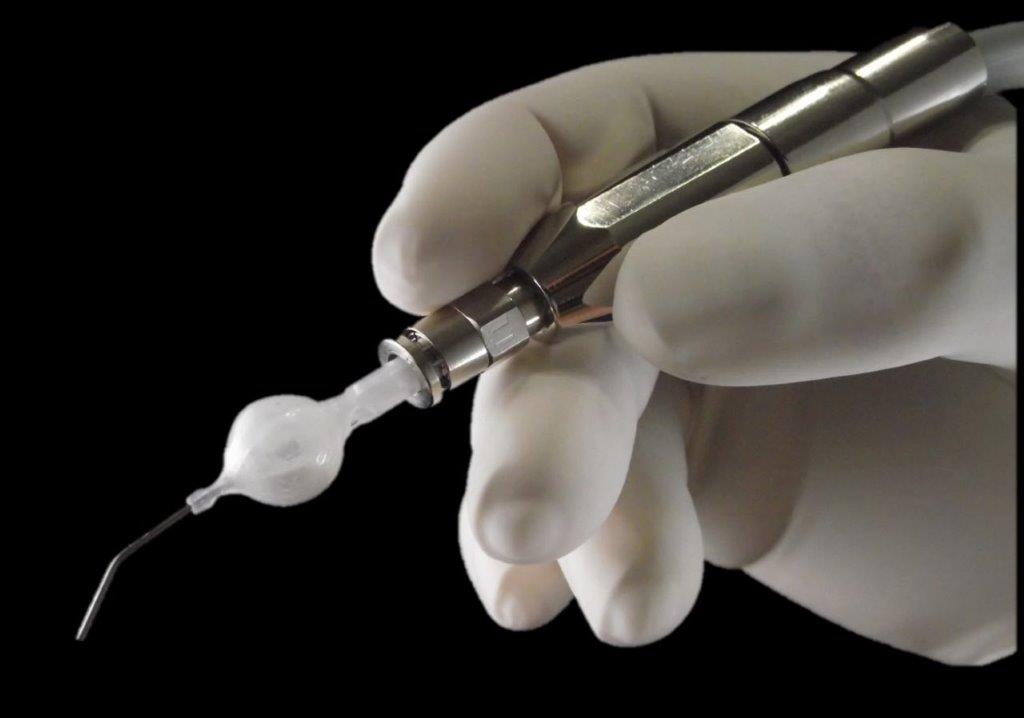
Once tooth preparation is complete, retraction creates a space for the impression material to go past the margin apically so that we can create the proper emergence profile of the restoration. There are many ways to retract prior to an impression. I personally use a second or top cord with a larger diameter than the primary cord I placed to move the tissue for subgingival preparation. If the tissue is bleeding after the placement of the top cord, I place 3M’s “Retraction paste” as a hemostatic agent. This allows for optimal control of bleeding without worry of negatively impacting the set of my impression materials or staining the prep or gingival tissues.

Taking the Final Impression

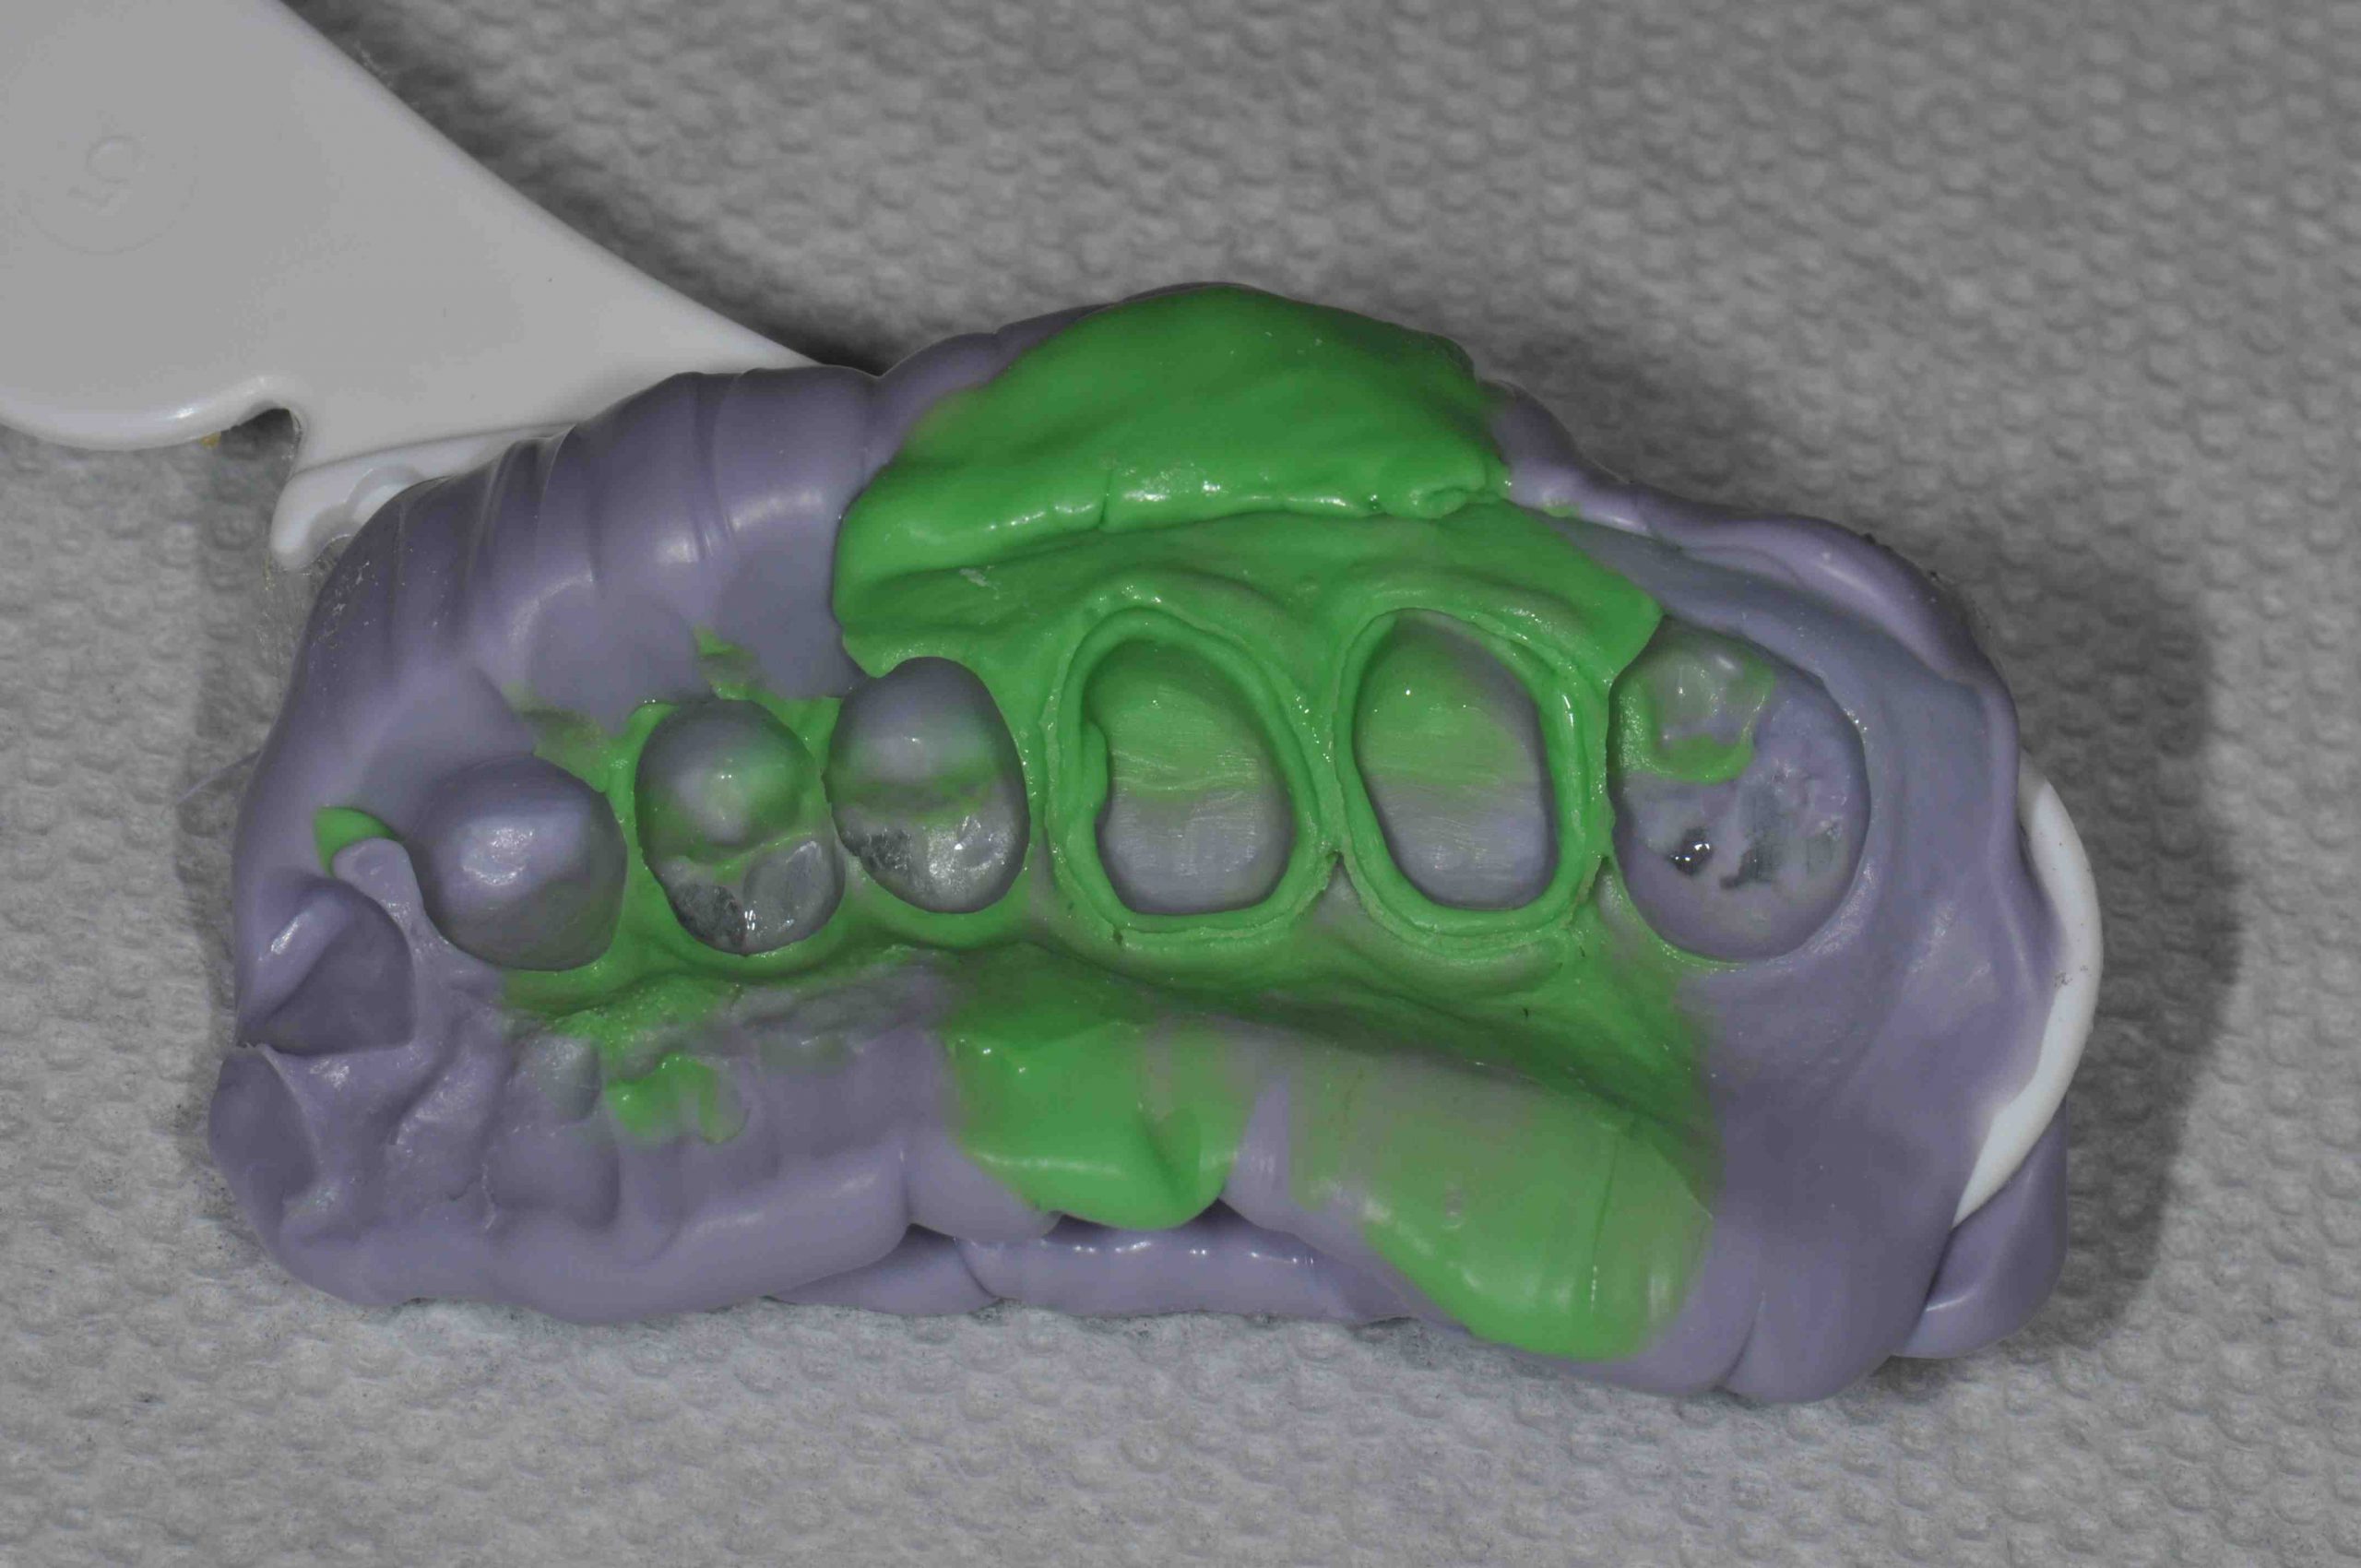
The final impression is taken with Flexitime impression material (Kulzer). I have my assistant load the tray with heavy body material. I first wet the top cord, so I do not cause bleeding upon removal. The area is now thoroughly dried to allow for proper contact of the impression material to the tooth and tissue surfaces. I inject Flexitime CorrectFlow (Kulzer) and then seat the impression tray. I hold the tray for the full intra-oral set time and do not allow patients to close or bite on the tray, as movement can negatively impact the accuracy of the impression.

Is the impression perfect?

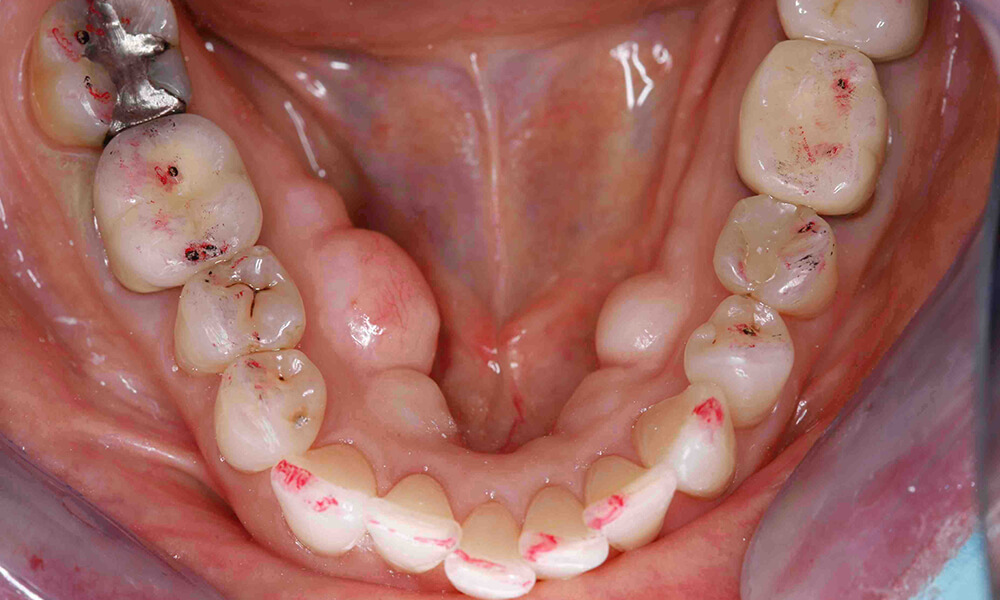
Once removed I inspect the impression using magnification to assess that I have adequate flash beyond the margins of the light body, no pulls, voids, drags or evidence that the impression moved. There is no way to correct an impression for errors. If errors occur, we repeat the process from the beginning to take a new impression.

Check out some of my short videos about impressions on Restorative Nation at https://restorativenation.com/?s=impression.

Related Course

E1: Aesthetic & Functional Treatment Planning at the Chicago Midwinter Dental Meeting

DATE: February 20 2025 @ 7:00 am - February 22 2025 @ 8:00 pm

Location: Chicago Midwinter Meeting

CE HOURS:

Transform your experience of practicing dentistry, increase predictability, profitability and fulfillment. The Essentials Series is the Key, and Aesthetic and Functional Treatment Planning is where your journey begins.  Following a system of…

Learn More>

About Author

User Image
Lee Ann Brady DMD

Dr. Lee Ann Brady is passionate about dentistry, her family and making a difference. She is a general dentist and owns a practice in Glendale, AZ limited to restorative dentistry. Lee’s passion for dental education began as a CE junkie herself, pursuing lots of advanced continuing education focused on Restorative and Occlusion. In 2005, she became a full time resident faculty member for The Pankey Institute, and was promoted to Clinical Director in 2006. Lee joined Spear Education as Executive VP of Education in the fall of 2008 to teach and coordinate the educational curriculum. In June of 2011, she left Spear Education, founded leeannbrady.com and joined the dental practice she now owns as an associate. Today, she teaches at dental meetings and study clubs both nationally and internationally, continues to write for dental journals and her website, sits on the editorial board of the Journal of Cosmetic Dentistry, Inside Dentistry and DentalTown Magazines and is the Director of Education for The Pankey Institute.

FIND A PANKEY DENTIST OR TECHNICIAN

I AM A
I AM INTERESTED IN

VIEW COURSE CALENDAR

Occlusal Wear Part 2: What is causing the wear?

August 16, 2019 Lee Ann Brady DMD

I believe that some wear is normal. I base this on the fact that I have very few if any patients who are in their seventies or eighties and still have mamelons on their incisors. Wear is a concern when the amount of tooth structure being lost is out pacing the patient’s age.

In Part 1 of this series, I wrote about determining when wear leaves the physiologic category and becomes something we need to discuss with patients. Both attrition and erosion can cause severe tooth wear, but they pose different long-term risks. Once we have a sense of the cause of tooth wear, we can partner with the patient to treat the damage and manage the progression.

These are the guidelines for discerning attrition from erosion.

Attrition is the loss of tooth structure caused when the patient rubs two tooth surfaces together. You will observe:

· Matching facets on upper and lower teeth

· Facets on tooth surfaces that occlude

· Enamel and dentin worn evenly

Erosion is caused by the presence of acid from issues like GERD and eating disorders. You will observe:

· Facets that may or may not match on upper and lower teeth

· Facets on tooth surfaces that are not in occlusion

· Dentin cupped out and wearing faster than enamel

· Tooth structure wearing around restorations that remain unchanged

Note that attrition can be seen in addition to erosion, often giving us a false sense of how much the patient truly parafunctions, as the etched tooth structure wears away more easily.

Related Course

E3: Restorative Integration of Form & Function

DATE: October 5 2025 @ 8:00 am - October 9 2025 @ 2:30 pm

Location: The Pankey Institute

CE HOURS: 41

Dentist Tuition: $ 7400

Single Occupancy with Ensuite Private Bath (per night): $ 345

Understanding that “form follows function” is critical for knowing how to blend what looks good with what predictably functions well. E3 is the phase of your Essentials journey in which…

Learn More>

About Author

User Image
Lee Ann Brady DMD

Dr. Lee Ann Brady is passionate about dentistry, her family and making a difference. She is a general dentist and owns a practice in Glendale, AZ limited to restorative dentistry. Lee’s passion for dental education began as a CE junkie herself, pursuing lots of advanced continuing education focused on Restorative and Occlusion. In 2005, she became a full time resident faculty member for The Pankey Institute, and was promoted to Clinical Director in 2006. Lee joined Spear Education as Executive VP of Education in the fall of 2008 to teach and coordinate the educational curriculum. In June of 2011, she left Spear Education, founded leeannbrady.com and joined the dental practice she now owns as an associate. Today, she teaches at dental meetings and study clubs both nationally and internationally, continues to write for dental journals and her website, sits on the editorial board of the Journal of Cosmetic Dentistry, Inside Dentistry and DentalTown Magazines and is the Director of Education for The Pankey Institute.

FIND A PANKEY DENTIST OR TECHNICIAN

I AM A
I AM INTERESTED IN

VIEW COURSE CALENDAR

Occlusal Wear Part 1: Is it advancing? How fast?

August 14, 2019 Lee Ann Brady DMD

I ask the question “Is wear normal?” at almost every lecture I do on occlusion. Usually the response is a small number of mumbled replies. A good follow up question is “How many eighty-five-year-old patients have you seen with mamelons?” I hope you are thinking not many, if any at all. So, yes, tooth wear of some amount is normal. A combination of attrition, erosion and abrasion cause all of us to lose enamel over a lifetime.

Is the wear advancing at a pathological rate?

The more important question is when is the wear age-appropriate and when is it advancing at a pathologic rate? We don’t have the data to know how many millimeters of enamel loss is appropriate at every decade of life. In order to help with this answer in my office, I play a mental game. With the picture of the patient’s current wear in mind and a knowledge of their age, I imagine if the wear continues at the same rate at what age their teeth will be in jeopardy or need restorative dentistry to be saved. I then reveal this estimate to the patient.

You can document wear over time in three ways.

I believe it is important that I help my patients understand the process and the options for protecting their teeth. To quantify the amount of wear that is happening, we take a measurement from the CEJ to the incisal edge of several teeth with wear. We take the measurement on the mid-facial and record it on the patient’s perio chart. At subsequent appointments we can now repeat these measurements and have clear data that the process is continuing. Another great way to document tooth wear is with photography. With repeat photographs, we and the patient can see the change over time. Today with digital impressions and software we can scan the arch, and then compare scans months or years later and get a precise measurement of the change.

Related Course

E3: Restorative Integration of Form & Function

DATE: August 11 2024 @ 8:00 am - August 15 2024 @ 2:30 pm

Location: The Pankey Institute

CE HOURS: 41

Full Tuititon: $ 7200

night with private bath: $ 290

Understanding that “form follows function” is critical for knowing how to blend what looks good with what predictably functions well. E3 is the phase of your Essentials journey in which…

Learn More>

About Author

User Image
Lee Ann Brady DMD

Dr. Lee Ann Brady is passionate about dentistry, her family and making a difference. She is a general dentist and owns a practice in Glendale, AZ limited to restorative dentistry. Lee’s passion for dental education began as a CE junkie herself, pursuing lots of advanced continuing education focused on Restorative and Occlusion. In 2005, she became a full time resident faculty member for The Pankey Institute, and was promoted to Clinical Director in 2006. Lee joined Spear Education as Executive VP of Education in the fall of 2008 to teach and coordinate the educational curriculum. In June of 2011, she left Spear Education, founded leeannbrady.com and joined the dental practice she now owns as an associate. Today, she teaches at dental meetings and study clubs both nationally and internationally, continues to write for dental journals and her website, sits on the editorial board of the Journal of Cosmetic Dentistry, Inside Dentistry and DentalTown Magazines and is the Director of Education for The Pankey Institute.

FIND A PANKEY DENTIST OR TECHNICIAN

I AM A
I AM INTERESTED IN

VIEW COURSE CALENDAR

Demystifying Occlusion

August 9, 2019 Lee Ann Brady DMD

I’ll admit that for a portion of my professional career I didn’t think twice about occlusion.

Today occlusion is as well integrated into my thought process as caries, perio or restorative considerations. What role does occlusion play in your practice? Is it part of your routine diagnostics? Is it fully integrated with your esthetic and restorative treatment planning? Or do you only wonder about it when a patient breaks something or you are concerned about moving forward with a severe wear case?

Early in my career occlusion would show up as a frustration.

One example is when I would prepare a second molar being very careful about creating adequate occlusal clearance, using both depth-cutting burs and checking the result with bite registration, just to have my assistant come and tell me she didn’t have enough clearance to make the provisional. It was a relief years later in my first CE course with a focus on occlusion to learn this was not rapid super-eruption or a mistake on my part, but muscle release due to removal of a key occlusal contact, and I could predict this before I prepped the tooth.

How about the patient who would come into my office for a hygiene visit or a buccal pit restoration with no joint sounds and call the next day concerned that their jaw had been clicking ever since they left the office the day before? What a relief when I learned these patients had an underlying risk for disc displacement called ligament laxity, and I could diagnose it quickly at an exam appointment.

An everyday occlusal issue I run into is the patient with a limited opening who needs posterior dentistry.

Perhaps, they can open at the beginning but rapidly fatigue and their jaw begins to shake and close as we work. What a gift it is today that I can identify this as a symptom of overuse of the elevator muscles, treat it easily and quickly at a restorative appointment with a deprogrammer, and offer the patient options for relaxing their muscles and allowing them to stay healthy.

The process of demystifying occlusion and having it become an everyday reality for me required committing to a series of hands-on CE programs, being willing to manage my learning, and then taking it back to my patients and beginning to use what I was learning in small steady steps. The benefit has been less frustration, increased confidence with my patients, and an ability to help patients in new and profound ways I didn’t have before.

My appreciation for occlusion didn’t stop with my practice.

It became a passion and is a huge piece of the continuing education I teach with The Pankey Institute to demystify occlusion for others.

Related Course

Smile Design: The 7 Deadly Sins

DATE: August 9 2024 @ 8:00 am - August 10 2024 @ 3:00 pm

Location: The Pankey Institute

CE HOURS: 16

Regular Tuition: $ 2195

Single Occupancy with Ensuite Private Bath (per night): $ 290

Designing Smiles is What We Do! From direct to indirect restorative – to clear aligners – to interdisciplinary care – designing smiles is what we do. Those who understand and…

Learn More>

About Author

User Image
Lee Ann Brady DMD

Dr. Lee Ann Brady is passionate about dentistry, her family and making a difference. She is a general dentist and owns a practice in Glendale, AZ limited to restorative dentistry. Lee’s passion for dental education began as a CE junkie herself, pursuing lots of advanced continuing education focused on Restorative and Occlusion. In 2005, she became a full time resident faculty member for The Pankey Institute, and was promoted to Clinical Director in 2006. Lee joined Spear Education as Executive VP of Education in the fall of 2008 to teach and coordinate the educational curriculum. In June of 2011, she left Spear Education, founded leeannbrady.com and joined the dental practice she now owns as an associate. Today, she teaches at dental meetings and study clubs both nationally and internationally, continues to write for dental journals and her website, sits on the editorial board of the Journal of Cosmetic Dentistry, Inside Dentistry and DentalTown Magazines and is the Director of Education for The Pankey Institute.

FIND A PANKEY DENTIST OR TECHNICIAN

I AM A
I AM INTERESTED IN

VIEW COURSE CALENDAR

Creating Dental Anatomy in Composite with Disposable Tips

June 17, 2019 Lee Ann Brady DMD

One of my goals with composite restorations is to do as much of the forming and shaping prior to picking up a curing light as I can.

The material is easy to sculpt before it is cured, and access to the surface of the tooth is easier with hand instruments. Once I have placed all the composite and have a dense fill, I remove as much of the excess sitting above the final occlusal surface as I can. With this step accomplished, I turn my attention to creating the occlusal anatomy.

My OptraSculpt handle and disposable tips from Ivoclar Vivadent are perfect for this. The various tip shapes allow me to create incline planes, occlusal grooves and the curve of the marginal ridges into the occlusal embrasures. This process often removes and shapes the composite. My assistant holds a two by two that has been moistened with rubbing alcohol to remove the excess off the end of the instrument. I can place a different shape on each end of the instrument, or I can interchange them as I need them.

Using a series of disposable tips enables me to work without the composite sticking. This has reduced the necessity for meticulous management of expensive instruments which frequently need replacement. And, I resist the desire to use dentin adhesive or an unfilled resin on the instrument to reduce sticking.

Related Course

Masters’ Week

DATE: June 3 2024 @ 8:00 am - June 6 2024 @ 2:00 pm

Location: The Pankey Institute

CE HOURS: 27

Regular Tuition: $ 8500

Night with private bath: $ 290

Master Your Skills Masters’ Week is a unique learning experience each and every year where we bring together a group of talented speakers to share on a range of topics….

Learn More>

About Author

User Image
Lee Ann Brady DMD

Dr. Lee Ann Brady is passionate about dentistry, her family and making a difference. She is a general dentist and owns a practice in Glendale, AZ limited to restorative dentistry. Lee’s passion for dental education began as a CE junkie herself, pursuing lots of advanced continuing education focused on Restorative and Occlusion. In 2005, she became a full time resident faculty member for The Pankey Institute, and was promoted to Clinical Director in 2006. Lee joined Spear Education as Executive VP of Education in the fall of 2008 to teach and coordinate the educational curriculum. In June of 2011, she left Spear Education, founded leeannbrady.com and joined the dental practice she now owns as an associate. Today, she teaches at dental meetings and study clubs both nationally and internationally, continues to write for dental journals and her website, sits on the editorial board of the Journal of Cosmetic Dentistry, Inside Dentistry and DentalTown Magazines and is the Director of Education for The Pankey Institute.

FIND A PANKEY DENTIST OR TECHNICIAN

I AM A
I AM INTERESTED IN

VIEW COURSE CALENDAR

Which Type of Zirconia Do You Want?

June 5, 2019 Lee Ann Brady DMD

Most dentists think of zirconia as the highest strength, all-ceramic material that they can use to balance esthetics and durability.

It is the material we go to for patients with occlusal risk, for second molars at higher risk of fracture and for all-ceramic bridges.

You have likely heard of flexural strengths of 900-1,400 mPa being thrown around. While this is the flexural strength of a certain category of zirconia, you might not be aware there are different types.

Not all Zirconia has the same strength.

Because dentists have demanded manufacturers make versions that are more esthetic, some types are not as strong and durable as others. The general rule of thumb follows. The prettiest zirconia is the weakest. Conversely, the opaquest zirconia is the strongest. For example, the white opaque zirconia that visible as the substructure on the underside of a bridge is the highest strength and may have flexural strengths of 1,000-1,400 mPa. The other end of the spectrum is the highly esthetic materials we refer to as “translucent,” “crystal” or “esthetic” zirconia, and they may have flexural strength of 500-700 mPa. There is also a category of material with strengths in between.

Because there are many manufacturers and brands, you will want to be familiar with what your lab offers. Ask your lab what types of zirconia they can provide, and their specific strengths. Ask your lab how you should specify which zirconia to use for a given case. This, of course, will be determined by the esthetic and functional demands of the individual situation.

Some labs can note your preferences in their computer. For example, they can note that you always want the middle strength material for second molars, the highest strength for bridges and the prettiest material for premolars.

Related Course

Pankey Scholar 15A

DATE: January 16 2025 @ 6:00 pm - January 18 2025 @ 3:00 pm

Location: The Pankey Institute

CE HOURS: 0

Dentist Tuition: $ 3495

Single Occupancy with Ensuite Private Bath (per night): $ 345

“A Pankey Scholar is one who has demonstrated a commitment to apply the principles, practices and philosophy they learned through their journey at The Pankey Institute.”   At its core,…

Learn More>

About Author

User Image
Lee Ann Brady DMD

Dr. Lee Ann Brady is passionate about dentistry, her family and making a difference. She is a general dentist and owns a practice in Glendale, AZ limited to restorative dentistry. Lee’s passion for dental education began as a CE junkie herself, pursuing lots of advanced continuing education focused on Restorative and Occlusion. In 2005, she became a full time resident faculty member for The Pankey Institute, and was promoted to Clinical Director in 2006. Lee joined Spear Education as Executive VP of Education in the fall of 2008 to teach and coordinate the educational curriculum. In June of 2011, she left Spear Education, founded leeannbrady.com and joined the dental practice she now owns as an associate. Today, she teaches at dental meetings and study clubs both nationally and internationally, continues to write for dental journals and her website, sits on the editorial board of the Journal of Cosmetic Dentistry, Inside Dentistry and DentalTown Magazines and is the Director of Education for The Pankey Institute.

FIND A PANKEY DENTIST OR TECHNICIAN

I AM A
I AM INTERESTED IN

VIEW COURSE CALENDAR

Triple Tray Versus Full Arch Impressions

February 7, 2019 Lee Ann Brady DMD

Indirect restorations are the mainstay of most general practices.

Deciding whether to take triple tray or full arch impressions is a process that represents the classic dilemma we all face. It feels like we are deciding between “quality” and “economics”. In truth I think there are “quality” and “economic” pros and cons to both types of impressions.

From an economic perspective triple tray impressions are a straightforward decision.

A triple tray and the VPS to take it represent about $10 in materials compared to two full arch trays, VPS material, facebow and bite registration at a cost of about $25 in materials. Additionally a very important economic factor is productive chair time. A triple tray impression should take about 5 minutes of chair time, whereas full arch impressions and all the accompanying records take approximately 15 to 20 minutes.

The balance to the chair time on the front end is the chair time required to seat and adjust the case. In order to do an accurate comparison of the seat appointment we need to discuss the technical risks and benefits of the two approaches. We are going to assume on the front end that both techniques are done with proper retraction and accurately represent the prep and margins. A triple tray impression captures the occlusal information at maximum intercuspal position extremely accurately, but it is the only functional position they can replicate.

Full arch impressions taken without a facebow transfer, either hand articulated, or with a bite registration only over the prepared teeth only give the same information about maximum intercuspal position to the laboratory as a triple tray.

The advantage to taking full arch impressions is that they can be mounted with a facebow transfer and allow the laboratory to see the interaction of the teeth in excursive and end to end positions. A facebow records the relationship of the maxillary arch to hinge axis in all planes of space, and then transfers this information to an articulator. It can also be used to communicate esthetic information about the relationship of the incisal and occlusal plane to the horizon if the bow is leveled when the record is taken.

So the ultimate difference between a triple tray and full arch impressions is the addition of functional information about excursive movements and end-to-end positions. This requires taking a facebow record, and can be increased in accuracy by setting the condylar elements on a semi-adjustable articulator either with a protrusive bite record or an end to end retracted photograph. Using either technique the most accurate bite record is always captured with the unprepared teeth in full occlusal contact. So the decision between the two approaches really depends on the functional and esthetic risk factors of the case. The more esthetic and functional information we send to the laboratory the higher our chances of managing the esthetic and functional issues of the case precisely.

Related Course

E4: Posterior Reconstruction and Completing the Comprehensive Treatment Sequence

DATE: May 2 2024 @ 8:00 am - May 6 2024 @ 2:30 pm

Location: The Pankey Institute

CE HOURS: 44

Dentist Tuition : $ 7300

night with private bath: $ 290

This Course Is Sold Out! The purpose of this course is to help you develop mastery with complex cases involving advanced restorative procedures, precise sequencing and interdisciplinary coordination. Building on…

Learn More>

About Author

User Image
Lee Ann Brady DMD

Dr. Lee Ann Brady is passionate about dentistry, her family and making a difference. She is a general dentist and owns a practice in Glendale, AZ limited to restorative dentistry. Lee’s passion for dental education began as a CE junkie herself, pursuing lots of advanced continuing education focused on Restorative and Occlusion. In 2005, she became a full time resident faculty member for The Pankey Institute, and was promoted to Clinical Director in 2006. Lee joined Spear Education as Executive VP of Education in the fall of 2008 to teach and coordinate the educational curriculum. In June of 2011, she left Spear Education, founded leeannbrady.com and joined the dental practice she now owns as an associate. Today, she teaches at dental meetings and study clubs both nationally and internationally, continues to write for dental journals and her website, sits on the editorial board of the Journal of Cosmetic Dentistry, Inside Dentistry and DentalTown Magazines and is the Director of Education for The Pankey Institute.

FIND A PANKEY DENTIST OR TECHNICIAN

I AM A
I AM INTERESTED IN

VIEW COURSE CALENDAR

Utilizing Chair-side Air Abrasion

January 13, 2019 Lee Ann Brady DMD

Chair-side air abrasion has numerous advantages, especially today when we use adhesive retention so much of the time.

The advantages for many years have been outweighed by the logistic challenges. With the advent of small, lightweight, easy to use air abrasion handpieces this is no longer true. When I became aware of the etchmaster I was skeptical, but I am now a believer and use air abrasion int he operatory all day long.

The Clinical Applications

One of the first things that many of us will utilize air abrasion for is to “etch” zirconia restorations for bonding during final seating. The only way to prepare the inside of a zirconia restoration is with 30-50 micron aluminum oxide. The particle size and type is critical. The ideal pressure is 1 bar (15psi). Next on my list is to clean tooth preparations prior to bonding and cementation. To me there is no better way to assure the removal of temporary cement and prepare a tooth for maximal adhesive retention than with 30 micron aluminum oxide.

My list goes on as I have started to prepare small class one cavity preparations using small glass beads in my chair-side unit. Cleaning out the occlusal grooves prior to a sealant and etching un-prepped enamel for anterior esthetic composite margins are other uses. In addition sodium bicarbonate can be used to remove stain. Now that I have a convenient, easy to use unit, I find more and more reasons everyday.

Air Abrasion Made Easy

When I first began to experiment with air abrasion the biggest challenge was the equipment and managing the logistics.  The Etchmaster is a small 3 to 4 inch attachment that connects to either a 3 or 4 hole line on your unit. The pressure is precisely controlled, for great clinical outcomes, and it means the patients mouth is not full of powder when you are done. The powders come in pre-filled tips that slide into the top of the hand-piece. You can choose from a variety of sizes and particle types and sizes. This means no more filling a reservoir with powder, wondering if you have too little or too much. It also means not wondering what particle type and size is in the reservoir the next time you go to use the unit.

Have you explored the clinical advantages of air abrasion? How has this been beneficial in your practice?

Related Course

E1: Aesthetic & Functional Treatment Planning at the Chicago Midwinter Dental Meeting

DATE: February 20 2025 @ 7:00 am - February 22 2025 @ 8:00 pm

Location: Chicago Midwinter Meeting

CE HOURS:

Transform your experience of practicing dentistry, increase predictability, profitability and fulfillment. The Essentials Series is the Key, and Aesthetic and Functional Treatment Planning is where your journey begins.  Following a system of…

Learn More>

About Author

User Image
Lee Ann Brady DMD

Dr. Lee Ann Brady is passionate about dentistry, her family and making a difference. She is a general dentist and owns a practice in Glendale, AZ limited to restorative dentistry. Lee’s passion for dental education began as a CE junkie herself, pursuing lots of advanced continuing education focused on Restorative and Occlusion. In 2005, she became a full time resident faculty member for The Pankey Institute, and was promoted to Clinical Director in 2006. Lee joined Spear Education as Executive VP of Education in the fall of 2008 to teach and coordinate the educational curriculum. In June of 2011, she left Spear Education, founded leeannbrady.com and joined the dental practice she now owns as an associate. Today, she teaches at dental meetings and study clubs both nationally and internationally, continues to write for dental journals and her website, sits on the editorial board of the Journal of Cosmetic Dentistry, Inside Dentistry and DentalTown Magazines and is the Director of Education for The Pankey Institute.

FIND A PANKEY DENTIST OR TECHNICIAN

I AM A
I AM INTERESTED IN

VIEW COURSE CALENDAR

Four Great Reasons For Prep Scrubs

May 30, 2018 Lee Ann Brady DMD

One of the most common questions I get is about the use of a category of materials we refer to as prep scrubs, prep wetting agents or desensitizers.  The question is usually do they actually make a difference, and are they worth the cost. The answer is “yes” and “yes”.

There are 4 things we are trying to accomplish: prevent sensitivity, antimicrobial activity, moisten dentin for bonding, reduce bond degradation over time. The prevention of sensitivity is caused in two ways. The first is the inclusion of HEMA in products like Gluma from Kulzer. The HEMA occludes the dentinal tubules and prevents fluid movement that triggers a pulpal response. The second is the anti-microbial activity of either glutaraldehyde (GLUMA) or chlorhexidine (Consepsis by Ultradent). Fewer bacteria left behind int he dentin means lower chances of a pulpitis that causes sensitivity or the ultimate need for a root canal.

Both chlorhexidine and glutaraldehyde also minimize the production of MMP’s (Matrix Metal Proteinases) the biologic process responsible for bond degradation. This means our bonded restorations last longer before we see marginal breakdown, leakage and secondary caries. The last function is to moisten the dentin to allow optimal penetration of the primer in our dentin adhesives. This means better hybrid zone development and better bonds and sealing of dentinal tubules.

So the answer to do they have benefit is a resounding yes. I have used Gluma on every tooth I have prepared for many years. I consider it extremely cost effective as I am not sure how to put a price on greater restorative longevity and less patient dissatisfaction due to sensitivity or post operative issues. The true cost should be about $2 a prepared tooth if dispensed properly, so that’s hard to argue with.

Related Course

The Pankey Hygienist: Where Clinical & Behavioral Science Unite

DATE: January 9 2025 @ 1:00 pm - January 11 2024 @ 8:00 pm

Location: The Pankey Institute

CE HOURS: 23

Regular Tuition: $ 3195

Single Occupancy Room with Ensuite Bath (Per Night): $ 345

The Power of Development Hygienists and Dentists: Are you ready for your hygiene appointments to be more effective both clinically and relationally? Can you imagine having a totally fresh perspective…

Learn More>

About Author

User Image
Lee Ann Brady DMD

Dr. Lee Ann Brady is passionate about dentistry, her family and making a difference. She is a general dentist and owns a practice in Glendale, AZ limited to restorative dentistry. Lee’s passion for dental education began as a CE junkie herself, pursuing lots of advanced continuing education focused on Restorative and Occlusion. In 2005, she became a full time resident faculty member for The Pankey Institute, and was promoted to Clinical Director in 2006. Lee joined Spear Education as Executive VP of Education in the fall of 2008 to teach and coordinate the educational curriculum. In June of 2011, she left Spear Education, founded leeannbrady.com and joined the dental practice she now owns as an associate. Today, she teaches at dental meetings and study clubs both nationally and internationally, continues to write for dental journals and her website, sits on the editorial board of the Journal of Cosmetic Dentistry, Inside Dentistry and DentalTown Magazines and is the Director of Education for The Pankey Institute.

FIND A PANKEY DENTIST OR TECHNICIAN

I AM A
I AM INTERESTED IN

VIEW COURSE CALENDAR

Chlorhexidine Varnish & Tissue Management

May 23, 2018 Lee Ann Brady DMD

One of the challenges we face today in dentistry is managing tissue health during the time period our patients are in provisonal restorations. This has become even more critical as we have incorporated more resin bonding techniques to seat indirect restorations. Isolation is critical to the long term success and can be challenging after multiple weeks in a bisacryl provisional.

We all stress oral hygiene to our patients during this time period, but let’s be honest there are barriers to optimal tissue health at the seat appointment. One barrier is often patients are fearful that their hygiene procedures will displace the provisional. This fear has them brush less vigorously, floss less or not at all, and even sometimes avoid that part of their mouths completely. Even when patients are undeterred int heir hygiene the provisional itself is often a barrier. Contacts can be less then optimal and increase interproximal food impaction. The Bisacryl itself, tends to hold and attract plaque due to a different surface texture even when finely polished.

Given the barriers and the goal of super healthy tissue, Chlorhexidine varnish (Cervitec Plus by Ivoclar) has become one of my favorite products. We are all familiar with the incredible anti-microbial effects of chlorhexidine, and also the reasons we dislike it. Cervitec does not have a bad taste, does not cause the typical brown staining, does not effect the patients taste buds, and they don’t have to remember to use it. Cervitec plus is a clear liquid applied with a micro-brush. At the end of any appointment where we have placed a provisional my assistants will coat the gingival margin with Cervitec as the last step before the patient leaves.

I have been using this as a critical step in my restorative procedures for over 5 years now, and I swear by it. I see almost perfect tissue health at seat appointments, and it is rare for me to struggle with isolation due to poor tissue management.

Related Course

E4: Posterior Reconstruction and Completing the Comprehensive Treatment Sequence

DATE: October 30 2025 @ 8:00 am - November 3 2025 @ 2:30 pm

Location: The Pankey Institute

CE HOURS: 44

Dentist Tuition: $ 7400

Single Occupancy with Ensuite Private Bath (per night): $ 345

The purpose of this course is to help you develop mastery with complex cases involving advanced restorative procedures, precise sequencing and interdisciplinary coordination. Building on the learning in Essentials Three…

Learn More>

About Author

User Image
Lee Ann Brady DMD

Dr. Lee Ann Brady is passionate about dentistry, her family and making a difference. She is a general dentist and owns a practice in Glendale, AZ limited to restorative dentistry. Lee’s passion for dental education began as a CE junkie herself, pursuing lots of advanced continuing education focused on Restorative and Occlusion. In 2005, she became a full time resident faculty member for The Pankey Institute, and was promoted to Clinical Director in 2006. Lee joined Spear Education as Executive VP of Education in the fall of 2008 to teach and coordinate the educational curriculum. In June of 2011, she left Spear Education, founded leeannbrady.com and joined the dental practice she now owns as an associate. Today, she teaches at dental meetings and study clubs both nationally and internationally, continues to write for dental journals and her website, sits on the editorial board of the Journal of Cosmetic Dentistry, Inside Dentistry and DentalTown Magazines and is the Director of Education for The Pankey Institute.

FIND A PANKEY DENTIST OR TECHNICIAN

I AM A
I AM INTERESTED IN

VIEW COURSE CALENDAR